Last Updated on 01/12/2025 by Eran Feit
Deep Learning Image Segmentation with U-Net
This tutorial demonstrates a complete U-Net image segmentation workflow. It is designed as a practical image segmentation tutorial, showing how deep learning image segmentation can be applied to
Check out our tutorial here : https://youtu.be/ZiGMTFle7bw
The tutorial is divided into four parts:
Part 1: Data Preprocessing and Preparation
In this part, you load and preprocess the persons dataset, including resizing images and masks, converting masks to binary format, and splitting the data into training, validation, and testing sets.
Part 2: U-Net Model Architecture
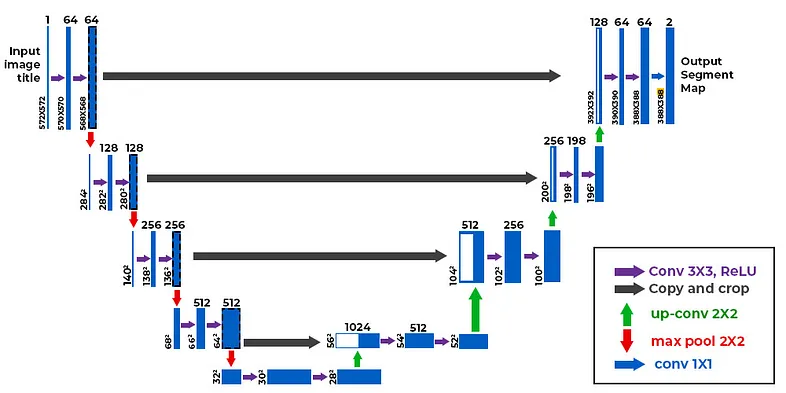
This part defines the U-Net model architecture using Keras. It includes building blocks for convolutional layers, constructing the encoder and decoder parts of the U-Net, and defining the final output layer.
Part 3: Model Training
Here, you load the preprocessed data and train the U-Net model. You compile the model, define training parameters like learning rate and batch size, and use callbacks for model checkpointing, learning rate reduction, and early stopping.
Part 4: Model Evaluation and Inference
The final part demonstrates how to load the trained model, perform inference on test data, and visualize the predicted segmentation masks
You can find more tutorials, and join my newsletter here : https://eranfeit.net/
Link for the full code here : https://eranfeit.lemonsqueezy.com/buy/43215be8-8033-4386-8ae0-5ba78d712082 or here : https://ko-fi.com/s/372080130c
Link for my blog : https://eranfeit.net/blog/
This tutorial is based on the U-net Architecture :

Here is the code for U-net Image Segmentation tutorial :
How to segment persons in images
Link for the dataset : https://www.kaggle.com/datasets/balraj98/cvcclinicdb
Part 1: Person Image Segmentation Data Preprocessing
This Python script prepares training and validation datasets for a person segmentation task using U-Net.
It loads images and corresponding segmentation masks, resizes them to a specified size, normalizes image pixel values,
and saves the processed data as .npy files for efficient use in deep learning models.
The dataset used is sourced from Kaggle and contains images of people with labeled segmentation masks.
# Import required libraries for image processing and data manipulation import cv2 import numpy as np import pandas as pd # Define image dimensions for resizing Height = 256 Width = 256 # Initialize empty lists to store images and masks for both training and validation sets allImages = [] maskImages = [] allValidateImages = [] maskValidatImages = [] # Define file paths for the dataset path = "e:/Data-sets/people_segmentation/" imagesPath = path + "images" maskPath = path + "masks" TrainFile = path + "segmentation/train.txt" validateFile = path + "segmentation/val.txt" # Load training file list using pandas df = pd.read_csv(TrainFile, sep=" ", header=None) filesList = df[0].values # Test loading process with a single image and mask # Load and resize a sample image img = cv2.imread(imagesPath+"/ache-adult-depression-expression-41253.jpg", cv2.IMREAD_COLOR) img = cv2.resize(img, (Width, Height)) cv2.imshow("img", img) # Load and process a sample mask # Masks are binary: 0 for background, 1 for human mask = cv2.imread(maskPath+"/ache-adult-depression-expression-41253.png", cv2.IMREAD_GRAYSCALE) MASK16 = cv2.resize(mask , (16,16)) print(MASK16) # Scale mask values to 255 for visualization mask = cv2.resize(mask , (Width, Height)) mask = mask * 255 cv2.imshow("mask", mask) cv2.waitKey(0) # Process all training images and masks print("Start loading the train images and masks ..............................") for file in filesList: # Construct file paths for each image and mask filePathForImage = imagesPath + "/" +file + ".jpg" filePathForMask = maskPath + "/" + file + ".png" print(file) # Load and preprocess image: resize and normalize to [0,1] img = cv2.imread(filePathForImage , cv2.IMREAD_COLOR) img = cv2.resize(img , (Width, Height)) img = img / 255.0 img = img.astype(np.float32) allImages.append(img) # Load and resize mask mask = cv2.imread(filePathForMask, cv2.IMREAD_GRAYSCALE) mask = cv2.resize(mask , (Width, Height)) maskImages.append(mask) # Convert lists to numpy arrays and ensure proper data types allImagesNP = np.array(allImages) maskImagesNP = np.array(maskImages) maskImagesNP = maskImagesNP.astype(int) # Print shapes for verification print ("Shapes of train images and masks :") print(allImagesNP.shape) print(maskImagesNP.shape) print(maskImagesNP.dtype) # Process validation images and masks df = pd.read_csv(validateFile, sep=" ", header=None) filesList = df[0].values print("Start loading the Validate images and masks ..............................") for file in filesList: # Similar process as training data but for validation set filePathForImage = imagesPath + "/" +file + ".jpg" filePathForMask = maskPath + "/" + file + ".png" print(file) # Load and preprocess validation images img = cv2.imread(filePathForImage , cv2.IMREAD_COLOR) img = cv2.resize(img , (Width, Height)) img = img / 255.0 img = img.astype(np.float32) allValidateImages.append(img) # Load and process validation masks mask = cv2.imread(filePathForMask, cv2.IMREAD_GRAYSCALE) mask = cv2.resize(mask , (Width, Height)) maskValidatImages.append(mask) # Convert validation data to numpy arrays allValidateImagesNP = np.array(allValidateImages) maskValidateImagesNP = np.array(maskValidatImages) maskValidateImagesNP = maskValidateImagesNP.astype(int) # Print validation set shapes print ("Shapes of train images and masks :") print(allValidateImagesNP.shape) print(maskValidateImagesNP.shape) print(maskValidateImagesNP.dtype) # Save processed arrays to disk print("Save the Data ......") np.save("e:/temp/Unet-Human-Train-Images.npy", allImagesNP) np.save("e:/temp/Unet-Human-Train-masks.npy", maskImagesNP) np.save("e:/temp/Unet-Human-Validate-Images.npy", allValidateImagesNP) np.save("e:/temp/Unet-Human-Validate-Masks.npy", maskValidateImagesNP) print("Finish save the data .............")Link for the full code here : https://ko-fi.com/s/372080130c
Part 2: U-Net Architecture Implementation for Image Segmentation
This code implements a modified U-Net architecture, a specialized convolutional neural network designed for image segmentation tasks.
The implementation includes a compact version of the original U-Net with reduced filter sizes for efficiency while maintaining the characteristic encoder-decoder structure with skip connections.
The network is particularly optimized for binary segmentation tasks (like separating person from background) using sigmoid activation in the output layer.
The architecture consists of an encoder path that captures context, a bridge that processes the most compressed representation, and a decoder path that enables precise localization, with skip connections linking the encoder and decoder paths to preserve spatial information.
# Import required TensorFlow libraries and specific Keras layers import tensorflow as tf from tensorflow.keras.layers import * from tensorflow.keras.models import Model # Define a convolutional block function that serves as a basic building block # Each block contains two sets of Conv2D -> BatchNorm -> ReLU def conv_block(x, num_filters): # First convolutional layer with batch normalization and ReLU activation x = Conv2D(num_filters, (3,3), padding="same")(x) # Apply 3x3 convolution x = BatchNormalization()(x) # Normalize the outputs x = Activation("relu")(x) # Apply ReLU activation # Second convolutional layer with batch normalization and ReLU activation x = Conv2D(num_filters, (3,3), padding="same")(x) # Repeat conv operation x = BatchNormalization()(x) # Normalize again x = Activation("relu")(x) # Apply ReLU activation return x # Main function to build the U-Net model def build_model(shape): # Define number of filters for each level (reduced from original U-Net for efficiency) num_filters = [16,32,48,64] # Original U-Net used [64,128,256,512] # Create input layer with specified shape inputs = Input((shape)) # Initialize list to store skip connections skip_x = [] x = inputs # Encoder path: progressively reduce spatial dimensions while increasing filters for f in num_filters: x = conv_block(x, f) # Apply convolutional block skip_x.append(x) # Store the output for skip connection x = MaxPool2D((2,2))(x) # Reduce spatial dimensions by half # Bridge: the bottommost layer that connects encoder to decoder x = conv_block(x, 128) # Original U-Net used 1024 filters here # Decoder path: progressively increase spatial dimensions while decreasing filters num_filters.reverse() # Reverse filter list for decoder path skip_x.reverse() # Reverse skip connections to match decoder levels for i, f in enumerate(num_filters): x = UpSampling2D((2,2))(x) # Double the spatial dimensions xs = skip_x[i] # Get corresponding skip connection x = Concatenate()([x,xs]) # Combine upsampled and skip features x = conv_block(x,f) # Apply convolutional block # Output layer x = Conv2D(1, (1,1), padding="same")(x) # 1x1 convolution to get single channel x = Activation("sigmoid")(x) # Sigmoid for binary segmentation # Create and return the complete model return Model(inputs, x)Link for the full code here : https://ko-fi.com/s/372080130c
The code implements a U-Net architecture with several key features:
- Modified filter sizes (16,32,48,64 instead of 64,128,256,512) for efficiency
- Consistent use of double convolutional blocks with batch normalization
- Skip connections to preserve spatial information
- Symmetric encoder-decoder structure
- Binary segmentation output using sigmoid activation
- Four levels of encoding/decoding with corresponding skip connections
- A bridge layer with 128 filters connecting encoder and decoder paths
This implementation is particularly suitable for tasks like person segmentation where the goal is to separate a subject from the background, offering a good balance between model capacity and computational efficiency.
Part 3: U-Net Model Training Pipeline for Person Segmentation
# Import numpy for array operations import numpy as np # Load the preprocessed training and validation data from saved numpy files print("start loading the Train data ....... ") allImagesNP = np.load("e:/temp/Unet-Human-Train-Images.npy") maskImagesNP= np.load("e:/temp/Unet-Human-Train-masks.npy") print("start loading the validate data ....... ") allValidateImagesNP = np.load("e:/temp/Unet-Human-Validate-Images.npy") maskValidateImagesNP = np.load("e:/temp/Unet-Human-Validate-Masks.npy") print("Finish save the data .............") # Print shapes of loaded arrays to verify dimensions print(allImagesNP.shape) print(maskImagesNP.shape) print(allValidateImagesNP.shape) print(maskValidateImagesNP.shape) # Define image dimensions Height = 256 Width = 256 # Import required libraries for model building and training import tensorflow as tf from Step02Model import build_model from keras.callbacks import ModelCheckpoint, ReduceLROnPlateau, EarlyStopping # Set up model parameters shape = (256, 256, 3) # Input shape: 256x256 RGB images lr = 1e-4 # Initial learning rate (0.0001) batch_size = 8 # Number of images per batch epochs = 50 # Maximum number of training epochs # Build the U-Net model using imported function model = build_model(shape) print(model.summary()) # Display model architecture # Configure the optimizer (Adam with specified learning rate) opt = tf.keras.optimizers.Adam(lr) # Compile model with binary cross-entropy loss (suitable for binary segmentation) model.compile(loss="binary_crossentropy", optimizer=opt, metrics=['accuracy']) # Calculate steps per epoch and validation steps based on batch size stepsPerEpoch = np.ceil(len(allImagesNP) / batch_size) validationSteps = np.ceil(len(allValidateImagesNP) / batch_size) # Define path for saving the best model best_model_file = "e:/temp/Human-Unet.h5" # Set up training callbacks for optimization: callbacks = [ # Save the best model based on validation performance ModelCheckpoint(best_model_file, verbose=1, save_best_only=True), # Reduce learning rate when validation loss plateaus # Reduces by factor of 0.1 after 3 epochs without improvement ReduceLROnPlateau(monitor="val_loss", patience=3, factor=0.1, verbose=1, min_lr=1e-6), # Stop training if validation loss doesn't improve after 5 epochs EarlyStopping(monitor="val_loss", patience=5, verbose=1) ] # Start model training history = model.fit( allImagesNP, # Training images maskImagesNP, # Training masks batch_size=batch_size, # Batch size epochs=epochs, # Maximum epochs verbose=1, # Show progress validation_data=(allValidateImagesNP, # Validation images maskValidateImagesNP), # Validation masks validation_steps=validationSteps, # Steps per validation steps_per_epoch=stepsPerEpoch, # Steps per training epoch shuffle=True, # Shuffle training data callbacks=callbacks # Training callbacks )Link for the full code here : https://ko-fi.com/s/372080130c
This code represents a sophisticated training pipeline with several key features:
- Efficient data loading from preprocessed numpy arrays
- Carefully tuned hyperparameters (learning rate, batch size, epochs)
- Advanced training optimization through callbacks:
- Model checkpointing to save best performing model
- Adaptive learning rate reduction to overcome plateaus
- Early stopping to prevent overfitting
- Binary cross-entropy loss suitable for segmentation
- Progress monitoring through accuracy metrics
- Data shuffling for better generalization
- Proper batch size handling with step calculations
This summary shows the architecture of the U-Net model, widely used in deep learning image
Part 4: Test the model – Person Segmentation Model Inference Pipeline
This script implements a complete inference pipeline for a trained U-Net segmentation model.
It demonstrates the practical application of the model by loading a pre-trained model and performing person segmentation on a single image.
The pipeline includes image preprocessing (resizing and normalization), model prediction, post-processing of the prediction mask (thresholding), and visualization of both the input image and resulting segmentation mask.
The script is particularly useful for testing the model’s performance on new images and provides visual feedback through OpenCV’s display capabilities.
# Import required libraries import numpy as np import tensorflow as tf import cv2 # Load the trained model from saved file best_model_file = "e:/temp/Human-Unet.h5" model = tf.keras.models.load_model(best_model_file) print(model.summary()) # Display model architecture # Define image dimensions matching training configuration Height = 256 Width = 256 # Define path and load test image imgPath = "TensorFlowProjects/Unet-Projects/Human Image Segmentation/One-Human.jpg" img = cv2.imread(imgPath, cv2.IMREAD_COLOR) # Load original image # Preprocess image for model input img2 = cv2.resize(img, (Width, Height)) # Resize to model's input dimensions img2 = img2 / 255.0 # Normalize pixel values to [0,1] # Add batch dimension as model expects 4D input (batch_size, height, width, channels) imgForModel = np.expand_dims(img2, axis=0) # Generate prediction using the model p = model.predict(imgForModel) resultMask = p[0] # Extract first (and only) mask from batch print(resultMask.shape) # Post-process the prediction mask # Convert probabilistic output to binary mask using 0.5 threshold # Values <= 0.5 become 0 (background) # Values > 0.5 become 255 (person) resultMask[resultMask <= 0.5] = 0 resultMask[resultMask > 0.5] = 255 # Calculate dimensions for display # Reduce image size to 25% for better visualization scale_precent = 25 width = int(img.shape[1] * scale_precent / 100) height = int(img.shape[0] * scale_precent / 100) dim = (width, height) # Resize both original image and mask for display img = cv2.resize(img, dim, interpolation=cv2.INTER_AREA) mask = cv2.resize(resultMask, dim, interpolation=cv2.INTER_AREA) # Display results cv2.imshow("image ", img) # Show original image cv2.imshow("Mask", mask) # Show segmentation mask cv2.waitKey(0) # Wait for key press # Save the resulting mask cv2.imwrite("e:/temp/testMask.png", mask)Link for the full code here : https://ko-fi.com/s/372080130c
This inference pipeline includes several key components:
- Model loading from saved weights
- Image preprocessing:
- Resizing to match model input requirements
- Normalization to [0,1] range
- Batch dimension addition
- Prediction generation and post-processing:
- Model inference
- Binary thresholding at 0.5
- Scaling to 8-bit range (0–255)
- Visualization:
- Image resizing for display
- Side-by-side comparison of input and output
- Mask saving functionality
- Professional error handling through proper OpenCV usage
- Efficient memory usage through appropriate array operations
The script serves as a practical tool for testing the segmentation model on new images and visualizing its performance in real-world applications.
“We successfully trained a U-Net to segment persons from the background
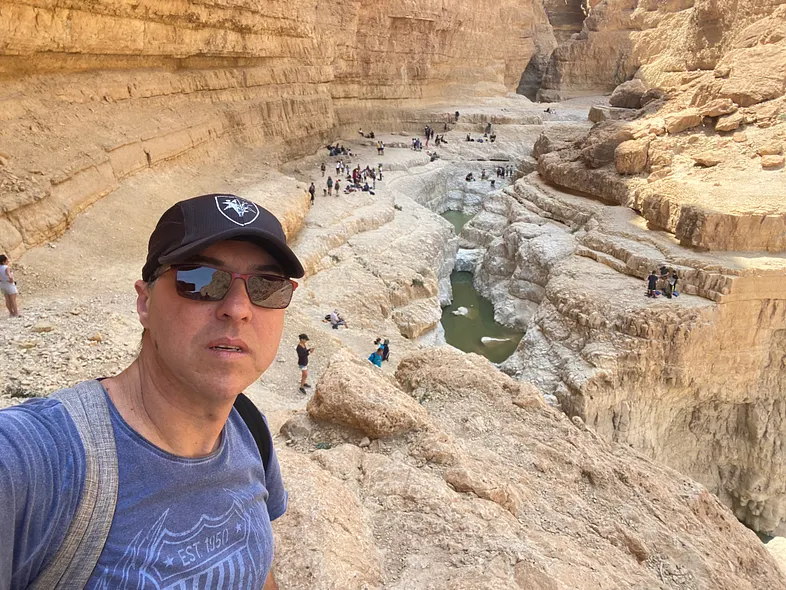
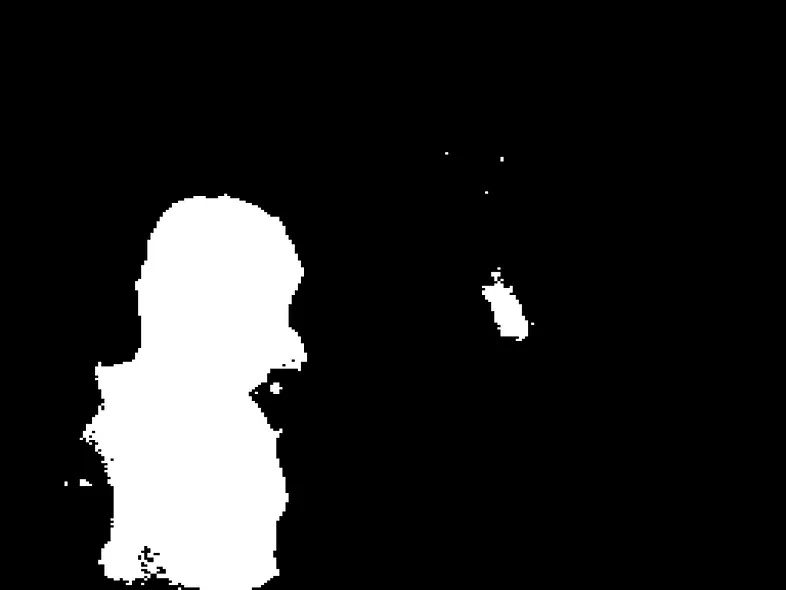
U-Net Image Segmentation Tutorial – Result :
Here is our test image and the predicted mask :


Connect :
☕ Buy me a coffee — https://ko-fi.com/eranfeit
🖥️ Email : feitgemel@gmail.com
🤝 Fiverr : https://www.fiverr.com/s/mB3Pbb
Planning a trip and want ideas you can copy fast?
Here are three detailed guides from our travels:
• 5-Day Ireland Itinerary: Cliffs, Castles, Pubs & Wild Atlantic Views
https://eranfeit.net/unforgettable-trip-to-ireland-full-itinerary/
• My Kraków Travel Guide: Best Places to Eat, Stay & Explore
https://eranfeit.net/my-krakow-travel-guide-best-places-to-eat-stay-explore/
• Northern Greece: Athens, Meteora, Tzoumerka, Ioannina & Nafpaktos (7 Days)
https://eranfeit.net/my-amazing-trip-to-greece/
Each guide includes maps, practical tips, and family-friendly stops—so you can plan in minutes, not hours.
Enjoy,
Eran
