Last Updated on 03/09/2026 by Eran Feit
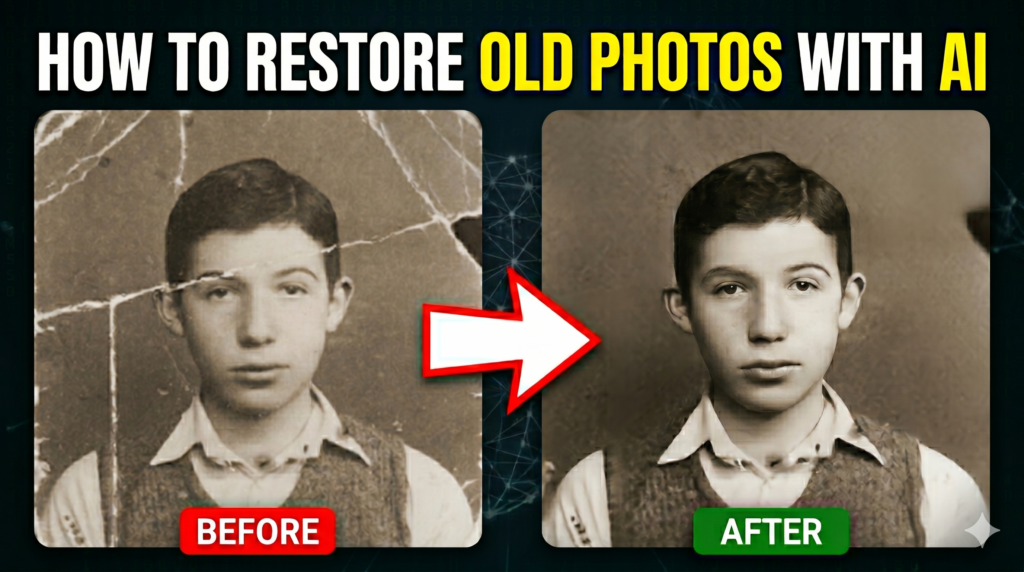
Preserving historical family memories or working with damaged digital archives often feels like a losing battle against time. Learning how to restore old photos using ai allows you to overcome the limits of traditional editing software, which can take hours of manual cloning to resolve physical tears, fading, and deep creases. This article provides a comprehensive, developer-focused technical walkthrough on how to leverage state-of-the-art open-source deep learning models to automate the entire repair process. By building a local software framework, you will gain full control over the refinement process without relying on restrictive, expensive web-to-print tools.
The true value of this guide lies in its practical, production-ready engineering focus. Instead of offering a surface-level overview of AI trends, this tutorial drops you straight into the underlying architecture of Microsoft’s premier deep learning pipeline. You will discover exactly how a dual-stream neural network isolates global structural damage from localized surface abrasions. For data scientists, computer vision creators, and technical engineers, this walkthrough provides actionable knowledge regarding complex environment setups, multi-repository alignment, and high-fidelity face reconstruction.
We will achieve this by walking step-by-step through a complete, localized Python implementation. We begin by configuring a dedicated virtual environment running PyTorch backed by hardware acceleration to ensure fast processing times. From there, you will learn how to integrate face landmark predictors and initialize pre-trained network checkpoints directly through the terminal. We will then dive into the practical execution scripts, moving from basic automated scratch isolation to high-resolution adjustments and multi-image folder workflows.
By the end of this resource, you will have a deep understanding of how to deploy these algorithms to achieve professional-grade results right on your local machine. Whether your goal is to process massive personal folders of vintage family heirlooms or to integrate high-fidelity image restoration scripts into an active computer vision workflow, the deployment strategies outlined below will serve as a permanent template for your development ecosystem.
Realizing the Power of Software to Restore Old Photos Using AI Modern digital preservation has evolved far beyond the limits of manual pixel healing and basic contrast filters. The primary goal of modern computer vision in this space is to reconstruct lost visual data while maintaining the authentic, historical character of the original print. By deploying specialized artificial intelligence models, we transition from simple automated editing to true algorithmic reconstruction. The framework analyzes degraded images to separate structural imperfections, like physical cracks, from non-structural degradation, such as color fading or camera blur.
At a high level, this advanced pipeline functions by treating photo restoration as a triplet domain translation problem. Real-world vintage photos suffer from a complex mix of unstructured defects that synthetic training data can rarely mimic perfectly. To overcome this, the deep learning network maps the damaged images into a shared latent space—a mathematical representation where the underlying features of the photo are isolated from the superficial damage. Once inside this space, a clean, restored image can be generated by decoding the uncorrupted data, while a separate masking stream targets and drops the physical scratch vectors entirely.
For faces that are blurry or severely faded, a dedicated face enhancement module is called into action. This component uses a deep facial prior to identify low-resolution, degraded facial geometry and intelligently synthesize crisp, realistic textures for eyes, skin, and hair. Rather than pasting a generic face over the original, the model uses geometric landmarks to ensure the enhanced features map perfectly to the structural proportions of the subject. The target outcome is a clean, balanced, high-resolution output file that preserves the genuine identity of the original image while erasing decades of physical wear and tear.
ai photo restoration python Executing a state-of-the-art deep learning pipeline locally requires a clean, structured workflow to successfully coordinate dependencies like PyTorch, CUDA hardware acceleration, and specialized face-landmark predictors. The following guide breaks down Microsoft’s “Bringing Old Photos Back to Life” framework into four distinct, logical phases: environment configuration, full pipeline deployment, isolated scratch detection, and global image restoration. By implementing these scripts sequentially, you will transition from a blank terminal to a fully functional, GPU-accelerated image restoration engine capable of processing complex digital archives.
Setting Up and Running the Deep Learning Restoration Engine The primary objective of this code ecosystem is to automate the extraction, masking, and algorithmic reconstruction of heavily degraded visual data. Written entirely in Python, this pipeline bridges the gap between raw, unmanaged repository files and production-ready computer vision execution. Instead of relying on a single generic filter, the code segregates tasks into independent processing modules—namely structural defect detection and localized facial mapping. This modularity ensures that high-resolution textures can be restored without losing the original layout or introducing synthetic warping.
At a high level, the structural foundation of the code relies on a dual-stream translation network that handles unstructured defects via a shared latent space. The setup commands programmatically download pre-trained weights and align synchronized batch normalization layers across multiple network architectures. This heavy architectural lifting allows the system to process severe physical abrasions, surface creases, and color fading concurrently. By calling distinct flags directly from the terminal, developers can toggle specific neural behaviors depending on the exact state of the input image.
When executing the scripts, the full pipeline serves as the primary orchestration layer, accepting raw folders of images and routing them through the active GPU layers. For standard vintage imagery, the code maps pixels cleanly to fix fading and contrast issues. However, when processing complex, physics-based damage like paper cracks, calling specialized scratch-detection scripts initializes a localized masking mechanism. This sub-routine isolates the cracked coordinates, allowing the global restoration module to heal structural voids seamlessly.
The final phase of the code architecture focuses on high-fidelity facial refinement using deep facial priors. Vintage photographs frequently suffer from grain artifacts and extreme lens blur that obscure facial identity. The integration of dlib’s 68-point landmark predictor allows the engine to mathematically locate eyes, noses, and mouths within the frame. Once mapped, the face enhancement module applies targeted resolution scaling up to high-definition (HR) standards, ensuring that restored portraits retain their genuine historical features with crisp clarity.
Why do we need to manually clone separate repositories during installation? While the core Microsoft architecture handles the foundational image translation, it relies heavily on external synchronized batch normalization and face prediction modules to process high-resolution files without crashing. Manually cloning the Synchronized-BatchNorm-PyTorch repository into both the Global and Face_Enhancement network folders ensures the deep learning layers communicate across multiple GPU processing streams efficiently. Without executing these manual xcopy operations and downloading the specific dlib landmark dataset, the script will throw missing module errors and fail to initialize the face enhancement or scratch isolation routines.
Link to the tutorial here
Download the code / instruction files for the tutorial here here
Link for Medium users here
Master Computer Vision
Follow my latest tutorials and AI insights on my
Personal Blog .
Beginner Complete CV Bootcamp
Foundation using PyTorch & TensorFlow.
Get Started → Interactive Deep Learning with PyTorch
Hands-on practice in an interactive environment.
Start Learning → Advanced Modern CV: GPT & OpenCV4
Vision GPT and production-ready models.
Go Advanced →
ai scratch removal photo Preserving historical family memories or working with damaged digital archives often feels like a losing battle against time. Learning how to restore old photos using ai allows you to overcome the limits of traditional editing software, which can take hours of manual cloning to resolve physical tears, fading, and deep creases. This article provides a comprehensive, developer-focused technical walkthrough on how to leverage state-of-the-art open-source deep learning models to automate the entire repair process. By building a local software framework, you will gain full control over the refinement process without relying on restrictive, expensive web-to-print tools.
The true value of this guide lies in its practical, production-ready engineering focus. Instead of offering a surface-level overview of AI trends, this tutorial drops you straight into the underlying architecture of Microsoft’s premier deep learning pipeline. You will discover exactly how a dual-stream neural network isolates global structural damage from localized surface abrasions. For data scientists, computer vision creators, and technical engineers, this walkthrough provides actionable knowledge regarding complex environment setups, multi-repository alignment, and high-fidelity face reconstruction.
We will achieve this by walking step-by-step through a complete, localized Python implementation. We begin by configuring a dedicated virtual environment running PyTorch backed by hardware acceleration to ensure fast processing times. From there, you will learn how to integrate face landmark predictors and initialize pre-trained network checkpoints directly through the terminal. We will then dive into the practical execution scripts, moving from basic automated scratch isolation to high-resolution adjustments and multi-image folder workflows.
By the end of this resource, you will have a deep understanding of how to deploy these algorithms to achieve professional-grade results right on your local machine. Whether your goal is to process massive personal folders of vintage family heirlooms or to integrate high-fidelity image restoration scripts into an active computer vision workflow, the deployment strategies outlined below will serve as a permanent template for your development ecosystem.
Setting Up and Running the Deep Learning Restoration Engine The primary objective of this code ecosystem is to automate the extraction, masking, and algorithmic reconstruction of heavily degraded visual data. Written entirely in Python, this pipeline bridges the gap between raw, unmanaged repository files and production-ready computer vision execution. Instead of relying on a single generic filter, the code segregates tasks into independent processing modules—namely structural defect detection and localized facial mapping. This modularity ensures that high-resolution textures can be restored without losing the original layout or introducing synthetic warping.
At a high level, the structural foundation of the code relies on a dual-stream translation network that handles unstructured defects via a shared latent space. The setup commands programmatically download pre-trained weights and align synchronized batch normalization layers across multiple network architectures. This heavy architectural lifting allows the system to process severe physical abrasions, surface creases, and color fading concurrently. By calling distinct flags directly from the terminal, developers can toggle specific neural behaviors depending on the exact state of the input image.
When executing the scripts, the full pipeline serves as the primary orchestration layer, accepting raw folders of images and routing them through the active GPU layers. For standard vintage imagery, the code maps pixels cleanly to fix fading and contrast issues. However, when processing complex, physics-based damage like paper cracks, calling specialized scratch-detection scripts initializes a localized masking mechanism. This sub-routine isolates the cracked coordinates, allowing the global restoration module to heal structural voids seamlessly.
The final phase of the code architecture focuses on high-fidelity facial refinement using deep facial priors. Vintage photographs frequently suffer from grain artifacts and extreme lens blur that obscure facial identity. The integration of dlib’s 68-point landmark predictor allows the engine to mathematically locate eyes, noses, and mouths within the frame. Once mapped, the face enhancement module applies targeted resolution scaling up to high-definition (HR) standards, ensuring that restored portraits retain their genuine historical features with crisp clarity.
Why do we need to manually clone separate repositories during installation? While the core Microsoft architecture handles the foundational image translation, it relies heavily on external synchronized batch normalization and face prediction modules to process high-resolution files without crashing. Manually cloning the Synchronized-BatchNorm-PyTorch repository into both the Global and Face_Enhancement network folders ensures the deep learning layers communicate across multiple GPU processing streams efficiently. Without executing these manual xcopy operations and downloading the specific dlib landmark dataset, the script will throw missing module errors and fail to initialize the face enhancement or scratch isolation routines.
Constructing the Local Environment Stack and Dependencies Building an advanced image restoration tool requires a rock-solid developer sandbox where frameworks communicate smoothly without version conflicts. This foundational segment initializes a dedicated Python environment, isolates the workspace directory, and checks for direct hardware acceleration hooks. By anchoring your script stack around targeted library versions like OpenCV and dlib, you eliminate the risk of random run-time compilation bugs.
The secondary step shifts focus directly onto file-system configuration and module integration. We selectively clone synchronized normalization subsets into internal model structures so that the deep learning layers scale properly across the machine’s RAM boundaries. This manual routing guarantees that the specialized neural modules can perform tensor transformations without resource exhaustion.
Finally, we finalize the installation setup by systematically fetching the pre-trained weights and specific landmark models. These external weights contain the geometric intelligence required to find old photo features and translate abstract pixel masks into smooth textures. Unzipping these check-pointed assets straight into the dedicated repository folders provides your local engine with immediate, out-of-the-box predictive capabilities.
Why do we explicitly pin down versions like PyTorch 2.5.1 and CUDA 12.4 during deployment? Pinning down specific framework versions prevents breaking changes in downstream libraries from throwing unfixable execution errors in your deep learning network. Using explicit combinations ensures that the low-level C++ tensor logic maps flawlessly to the NVIDIA drivers installed on your host processor. If you simply pull the absolute newest unpinned packages from open repositories, subtle changes in sub-dependency layouts will break structural tracking hooks during live runs.
Part 1 : Install # 1. Create conda environment: conda create - n BackToLife python = 3.11 conda activate BackToLife # 2. clone the "repo" to a working directory md tutorials cd tutorials git clone https : // github . com / microsoft / Bringing - Old - Photos - Back - to - Life . git cd Bringing - Old - Photos - Back - to - Life # 3. Install : nvcc -- version # Cuda 12.4 conda install pytorch == 2.5 . 1 torchvision == 0.20 . 1 torchaudio == 2.5 . 1 pytorch - cuda = 12.4 - c pytorch - c nvidia # More : pip install opencv - python == 4.11 . 0 . 86 pip install matplotlib == 3.10 . 0 pip install dlib == 20.0 . 1 pip install scikit - image == 0.26 . 0 pip install easydict == 1.13 pip install PyYAML == 6.0 . 3 pip install dominate == 2.9 . 1 pip install dill == 0.4 . 1 pip install tensorboardX == 2.6 . 5 pip install scipy == 1.17 . 1 pip install einops == 0.8 . 2 pip install pysimplegui == 6.0 # 4. Clone the Synchronized-BatchNorm-PyTorch repository for cd Face_Enhancement \ models\networks\ git clone https : // github . com / vacancy / Synchronized - BatchNorm - PyTorch xcopy / E / I / Y Synchronized - BatchNorm - PyTorch \ sync_batchnorm sync_batchnorm cd . .\ ..\..\ cd Global \ detection_models git clone https : // github . com / vacancy / Synchronized - BatchNorm - PyTorch xcopy / E / I / Y Synchronized - BatchNorm - PyTorch \ sync_batchnorm sync_batchnorm cd . .\ ..\ # 5. Download the landmark detection pretrained model cd Face_Detection curl - L - O http : // dlib . net / files / shape_predictor_68_face_landmarks . dat . bz2 # Decompression via Python (since cmd doesn't have a built-in bzip2 tool): python - c " import bz2; open('shape_predictor_68_face_landmarks.dat', 'wb').write(bz2.BZ2File('shape_predictor_68_face_landmarks.dat.bz2').read()) " cd . . # 6. Download the pretrained model : #put the file Face_Enhancement/checkpoints.zip under ./Face_Enhancement, #and put the file Global/checkpoints.zip under ./Global. Then unzip them respectively. cd Face_Enhancement curl - L - O https : // github . com / microsoft / Bringing - Old - Photos - Back - to - Life / releases / download / v1 . 0 / face_checkpoints . zip tar - xf face_checkpoints . zip cd . . cd Global curl - L - O https : // github . com / microsoft / Bringing - Old - Photos - Back - to - Life / releases / download / v1 . 0 / global_checkpoints . zip tar - xf global_checkpoints . zip cd . . Summary: You have built a fully containerized environment and properly mapped the necessary pre-trained deep learning network assets into a single clean environment stack.
Deploying the Full Orchestration Pipeline on Vintage Prints Executing the multi-tiered code pipeline is where the raw data transitions into polished visual memory. This operational core exposes the root execution script, which serves as the main controller for processing input imagery folders. By passing structural parameters via the terminal, you instruct the engine to cleanly delineate between mild fading adjustments and comprehensive physical healing layers.
The behavior of the framework shifts intelligently depending on whether the asset suffers from physical degradation. When working with simple faded prints, a direct path avoids running computation-heavy scratch repair modules entirely. This direct route saves processing overhead by concentrating neural energy purely on tone restoration and basic structural noise removal.
For heavily fractured media, the pipeline accepts special structural parameters to trigger deep scratch masking layers. When handling massive modern display exports, appending high-resolution adjustments allows the code to allocate memory dynamically. This dynamic mapping ensures the algorithm scales up to large dimensions without downsampling delicate facial features or historical details.
How does the backend change its execution path when the with_scratch flag is passed? When the --with_scratch argument is supplied in the execution parameters, the master orchestration script intercepts the standard processing loop. It diverts the target graphic asset into an isolated encoder-decoder sub-network designed exclusively to segment pixel gaps and cracks. If this argument is left out, the engine skips the spatial tracking phase entirely to finish basic color mapping and noise suppression routines much faster.
Part 2 : Full Pipeline (Restore old images) #For images without scratches: python run . py -- input_folder [ test_image_folder_path ] \ -- output_folder [ output_path ] \ -- GPU 0 # For scratched images: python run . py -- input_folder [ test_image_folder_path ] \ -- output_folder [ output_path ] \ -- GPU 0 \ -- with_scratch python run . py -- input_folder test_images \ old_w_scratch --output_folder result/Full_Pipeline/old_w_scratch --GPU 0 --with_scratch #For high-resolution images with scratches: python run . py -- input_folder [ test_image_folder_path ] \ -- output_folder [ output_path ] \ -- GPU 0 \ -- with_scratch \ -- HR Summary: Running these commands passes input folders directly into the master pipeline to cleanly automate image output generation.
Running Autonomous Surface Scratch Detection Sub-routines Isolating actual physical damage from original photograph details represents one of the most complex tasks in computer vision. This dedicated sub-module handles the exclusive initialization of specialized defect-masking scripts located inside the global directory. By dropping into this subset of code, developers can output distinct black-and-white binary maps highlighting crack lines.
The script relies on calculating strict pixel transformations across variable input constraints. You can dynamically scale the processing grid to handle images via down-sampled windows or full-size pixel arrays. Adjusting this sizing tells the network how broad of a field it should look at when separating intentional line drawings from random emulsion tears.
By verifying these standalone detection loops, you can inspect how effectively the model targets physical defects before running full-scale merges. This provides a highly functional checkpoint for complex batches where complex backdrops might otherwise confuse standard automatic heuristics.
What is the practical difference between choosing full_size versus scale_256 for the input_size argument? Selecting full_size forces the spatial detection networks to analyze every individual pixel coordinate at native resolution. This yields extremely sharp masks for fine cracks, though it demands a significant amount of active VRAM. Choosing scale_256 scales the internal processing matrix down to a tight coordinate square, offering exceptionally fast detection speeds for quick batch previews.
part 3 : Scratch Detection cd Global / python detection . py -- test_path [ test_image_folder_path ] \ -- output_dir [ output_path ] \ -- input_size [ resize_256 | full_size | scale_256 ] python detection . py -- test_path . .\ test_images\old_w_scratch --output_dir ../result/Scratch_Detection/old_w_scratch --input_size full_size Summary: Isolating this sub-routine outputs independent binary masks highlighting physical photo surface damage.
how to restore old photos using ai Executing Global Reconstruction and Tone Restoration Scripts The final phase of the code involves applying targeted structural healing using your pre-generated scratch maps. This section runs execution paths that reconstruct the underlying image composition without altering key spatial identities. By calling independent restoration modules, developers can choose whether to focus solely on deep texture healing or pure color balancing.
When executing paths backed by pre-compiled binary masks, the engine treats the blacked-out zones as blank target matrices. It cleanly infills the missing color signatures by evaluating surrounding global context boundaries. This clears away long surface cracks while keeping the remaining clean photographic details completely intact.
Alternatively, if an old photo lacks deep tears but suffers from chemical fading, a streamlined processing path is called. This operational branch maximizes standard tone normalization, contrast leveling, and structural sharpening. It provides clean output optimization for well-preserved historical imagery that simply needs an automated face-lift.
How does the –Quality_restore script handle images without needing an accompanying input mask file? When you run the script with the --Quality_restore parameter alone, the network bypasses the pixel-infilling sub-routines completely. Instead of fixing broken structural holes, the convolutional layers act as a comprehensive generative mapping model. This configuration optimizes texture clarity, drops overall high-frequency background grain, and enhances facial structures uniformly across the image.
Part 4 : Global Restoration cd Global / # With Scratches and quality restore python test . py -- Scratch_and_Quality_restore \ -- test_input [ test_image_folder_path ] \ -- test_mask [ corresponding mask ] \ -- outputs_dir [ output_path ] # With quality restore python test . py -- Quality_restore \ -- test_input [ test_image_folder_path ] \ -- outputs_dir [ output_path ] python test . py -- Quality_restore -- test_input . . / test_images \ old --outputs_dir ../result/Global_Restoration/old Summary: Executing these final test arrays cleanly merges quality enhancements with structural repairs to output gorgeous, restored results.
FAQ What Python version is required to run this Microsoft restoration code? This pipeline requires Python 3.11 inside a dedicated Conda workspace. Using higher versions triggers dependency syntax conflicts with legacy structures inside dlib or easydict compilation workflows.
Why does the dlib landmark model need to be unzipped via an inline Python statement? Standard Windows command prompts do not contain native utility commands to decode .bz2 formats out of the box. Running an inline Python stream using the built-in bz2 module extracts the model reliably.
How do I resolve out-of-memory or VRAM execution errors? You can resolve resource constraints by scaling down your processing grid using the –input_size scale_256 flag during mask detection. Make sure you are using the proper CUDA-accelerated PyTorch build.
What is the role of Synchronized-BatchNorm-PyTorch inside this framework? It handles synchronized batch normalization across the face processing and global restoration modules. This prevents training variance bugs from corrupting image matrices during evaluation loops.
Can this deep learning script fix old photos that suffer from severe water damage? Yes, by utilizing the –with_scratch flag, the pipeline generates a localized structural mask that isolates broad missing areas. The global testing modules then infill those missing zones seamlessly.
What is the specific function of the –HR parameter? The –HR parameter activates a high-resolution processing branch that preserves intricate fine-grain details and edge tracking, preventing large-scale images from looking artificially smoothed out.
Where should the pre-trained checkpoints be placed if the links fail? The checkpoints must be placed manually inside Face_Enhancement/checkpoints.zip and Global/checkpoints.zip. You must extract the contents within those folders before running run.py.
Why does the script output three distinct phase folders inside results? The system segregates processing results into Full Pipeline, Scratch Detection, and Global Restoration. This allows you to easily verify individual masking errors without re-running everything.
How does the face enhancement module avoid turning faces into generic avatars? It uses a deep facial prior paired with dlib’s 68-point spatial mapping vector to anchor the restoration. This ensures enhanced textures map accurately onto the unique facial structure of the original subject.
Is a dedicated NVIDIA graphics processor absolutely mandatory to run these tools? While the pipeline is optimized to run efficiently on an NVIDIA GPU using CUDA acceleration, it can fallback to CPU execution. However, processing times for high-resolution images will increase significantly.
Conclusion Deploying Microsoft’s specialized computer vision pipeline locally provides you with a powerful, production-grade architecture to restore old photos using AI. By replacing fragile, paid online tools with containerized Python execution scripts, you gain absolute control over facial alignment, high-resolution processing grids, and custom scratch masking loops. This tutorial serves as an open template that can be scaled up to parse massive image datasets or integrated directly into broad AI applications. As you continue building out your development workflow, these local environment setups and deep restoration checkpoints will provide a robust framework for preserving historical visual media with pristine, realistic detail.
Connect ☕ Buy me a coffee — https://ko-fi.com/eranfeit
🖥️ Email : feitgemel@gmail.com
🌐 https://eranfeit.net
🤝 Fiverr : https://www.fiverr.com/s/mB3Pbb
Enjoy,
Eran
 Skip to content