Last Updated on 31/07/2026 by Eran Feit
Real time video captioning python pipelines allow developers to transform static AI video analysis into continuous, frame-by-frame commentary streams. This article walks through building a complete multimodal video intelligence system from scratch using Python, Qwen2-VL, and the LiveCC architecture. Instead of waiting for an entire video to finish processing before receiving output, you will discover how to feed live video frames sequentially into vision-language models, generating instant text descriptions and dynamic video overlays as playback happens.
Whether you are developing automated video summarization tools, smart media accessibility features, or automated content moderation tools, this guide delivers practical, deployment-ready engineering code. You will gain a deep understanding of optimizing open-source vision-language architectures using hardware acceleration tools like Flash Attention 2 and Liger Kernel on WSL. Furthermore, the tutorial demonstrates how to bridge complex deep learning inference directly with OpenCV visual rendering and yt-dlp automation, allowing you to scale your projects from simple local test files to live YouTube streams.
To achieve this, the article provides a structured, step-by-step technical breakdown starting with high-performance Linux environment setup on Windows via WSL. From there, we examine three full Python scripts: building initial streaming inference, attaching real-time preview overlays with custom frame-matching logic, and wrapping everything into an end-to-end pipeline that downloads and auto-captions online content directly from YouTube URLs.
By following along, you will master the exact patterns required to build a robust real time video captioning python application. Each code snippet is accompanied by clear explanations of its underlying mechanics, ensuring you walk away with transferable skill sets for deploying modern multimodal AI models into production-ready software.
What is Real Time Video Captioning Python and Why Does It Matter? Modern computer vision has evolved far beyond basic object detection and static image classification. Processing temporal data in real time allows systems to interpret continuous context, moving beyond snapshot-based analysis to understand actions, causal events, and narrative progression as they unfold. Implementing a real time video captioning python system enables software applications to process incoming video feeds frame-by-frame, continuously outputting descriptive natural language narratives that mirror human perception.
The primary target of real-time video captioning is to break down the barrier between raw pixel arrays and actionable linguistic insights with minimal latencies. Traditional multimodal pipelines require reading an entire video file into disk memory before passing it to an inference pipeline. By contrast, streaming visual models process temporal context in small, rolling time windows. This architecture allows developers to build responsive monitoring systems, live sports commentaries, assistive technology for visually impaired users, and instant metadata tagging engines for high-volume video platforms.
At a high level, achieving fluid continuous captions requires a carefully orchestrated balance between vision-language model efficiency and frame sampling strategies. Models like Qwen2-VL, enhanced by specialized execution kernels, analyze interleaved visual patches against prompt histories to maintain coherent context without exhausting GPU memory. Combining these deep learning backends with fast frame-extraction libraries and OpenCV rendering gives developers the flexibility to inspect, overlay, and encode generated subtitles directly onto video streams with frame-accurate timing.
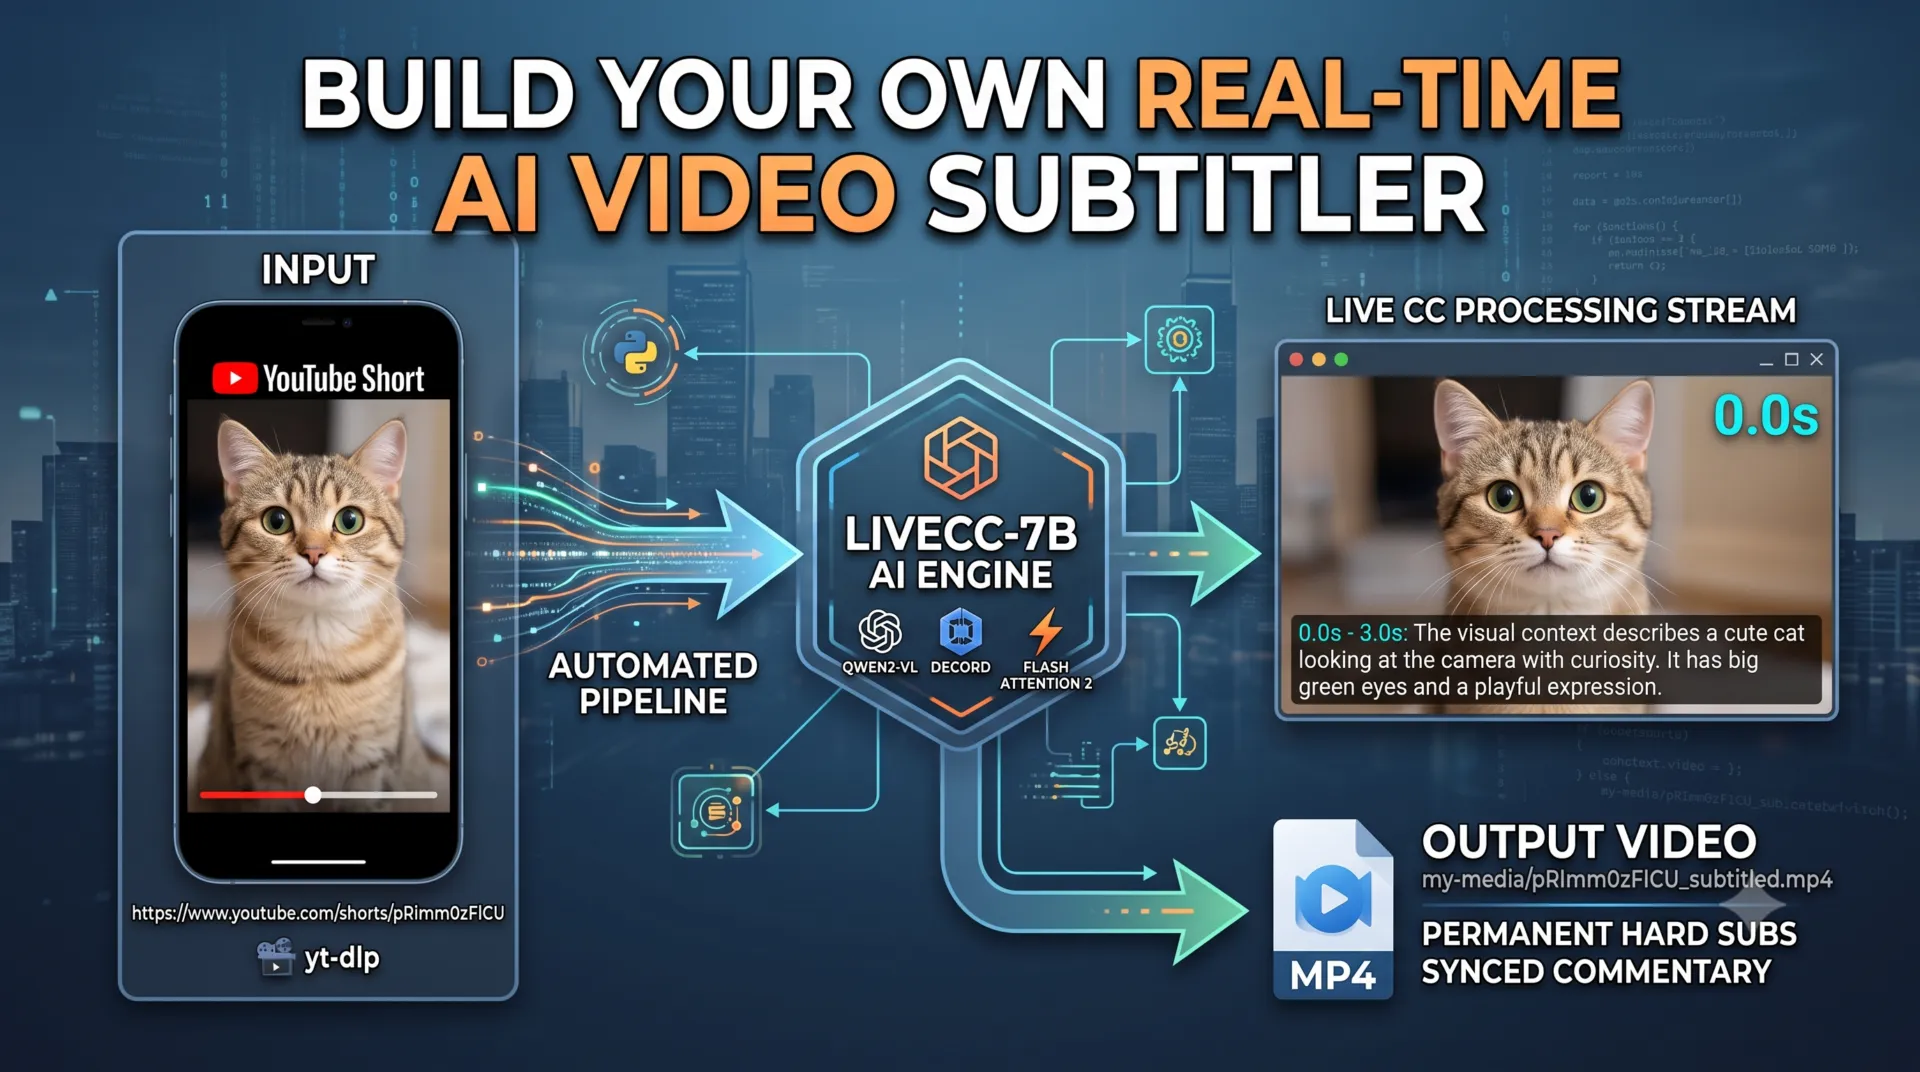
Build Real Time Video Captioning Python Pipelines with LiveCC 9 Unlocking Continuous Video Intelligence with LiveCC and Qwen2-VL How Does This Python Pipeline Process Live Video Streams in Real Time? By combining smart frame caching with rolling temporal context, the system feeds small clips into a hardware-accelerated Qwen2-VL model to generate continuous natural language commentaries without reprocessing the full video from scratch.
Transitioning from static computer vision models to continuous video intelligence requires a shift in how visual frames and language prompts are processed over time. The primary objective of the provided code is to establish an end-to-end, real-time video captioning Python pipeline that reads streaming media, extracts temporal frame batches, generates live natural language commentaries using Qwen2-VL, and burns those generated subtitles back onto the video file. Instead of treating every video frame as an isolated image, this technical framework maintains a running conversation history to describe actions and narrative progression dynamically as they unfold.
At its core, the architecture relies on the LiveCC framework optimized by Liger Kernel transformer wrappers and Flash Attention 2. In Step 1, the script initializes the LiveCCDemoInfer engine, loading the pre-trained LiveCC-7B-Instruct model onto GPU memory. A specialized video reader calculates the precise timestamps (video_pts) for incoming media streams, allowing the algorithm to sample frames at designated frame rates (such as 2 FPS) and organize them into interleaved time windows. By caching past key-value representations (past_key_values) and generated token sequences (past_ids), the model avoids redundant computations and seamlessly tracks sequential context from one second to the next.
Step 2 extends the core inference pipeline by introducing real-time visual feedback and automated video post-processing using OpenCV. As commentaries are generated for each temporal segment, an interactive GUI window previews the current frame with a dual-overlay setup: a dynamic timestamp box in the top-right corner and a dark-backed subtitle string anchored to the bottom-left. Once the initial inference pass completes, the script executes a frame-matching compilation loop. It sequentially iterates through every original frame of the source video, maps the correct timestamped commentary to each moment, and encodes a rendered MP4 video file complete with hardcoded burned-in narration.
In Step 3, the pipeline achieves production-level versatility through seamless integration with yt-dlp. Rather than restricting processing to local disk files, this extended module accepts any public YouTube video or YouTube Shorts URL, automatically inspecting media formats to fetch high-compatibility H.264/AVC video tracks directly into your local workspace. The downloaded asset is immediately funneled through the same LiveCC inference and OpenCV rendering loops, establishing a complete end-to-end workflow capable of ingesting raw online video URLs and outputting fully annotated, sub-titled video assets automatically.
Link to the tutorial here .
Download the code for the tutorial here here
Link for Medium users here
Master Computer Vision
Follow my latest tutorials and AI insights on my
Personal Blog .
Beginner Complete CV Bootcamp
Foundation using PyTorch & TensorFlow.
Get Started → Interactive Deep Learning with PyTorch
Hands-on practice in an interactive environment.
Start Learning → Advanced Modern CV: GPT & OpenCV4
Vision GPT and production-ready models.
Go Advanced →
Build Real Time Video Captioning Python Pipelines with LiveCC 10 Build Real Time Video Captioning Python Pipelines with LiveCC Real time video captioning python pipelines allow developers to transform static AI video analysis into continuous, frame-by-frame commentary streams. This article walks through building a complete multimodal video intelligence system from scratch using Python, Qwen2-VL, and the LiveCC architecture. Instead of waiting for an entire video to finish processing before receiving output, you will discover how to feed live video frames sequentially into vision-language models, generating instant text descriptions and dynamic video overlays as playback happens.
Whether you are developing automated video summarization tools, smart media accessibility features, or automated content moderation tools, this guide delivers practical, deployment-ready engineering code. You will gain a deep understanding of optimizing open-source vision-language architectures using hardware acceleration tools like Flash Attention 2 and Liger Kernel on WSL. Furthermore, the tutorial demonstrates how to bridge complex deep learning inference directly with OpenCV visual rendering and yt-dlp automation, allowing you to scale your projects from simple local test files to live YouTube streams.
To achieve this, the article provides a structured, step-by-step technical breakdown starting with high-performance Linux environment setup on Windows via WSL. From there, we examine three full Python scripts: building initial streaming inference, attaching real-time preview overlays with custom frame-matching logic, and wrapping everything into an end-to-end pipeline that downloads and auto-captions online content directly from YouTube URLs.
By following along, you will master the exact patterns required to build a robust real time video captioning python application. Each code snippet is accompanied by clear explanations of its underlying mechanics, ensuring you walk away with transferable skill sets for deploying modern multimodal AI models into production-ready software.
What is Real Time Video Captioning Python and Why Does It Matter? Modern computer vision has evolved far beyond basic object detection and static image classification. Processing temporal data in real time allows systems to interpret continuous context, moving beyond snapshot-based analysis to understand actions, causal events, and narrative progression as they unfold. Implementing a real time video captioning python system enables software applications to process incoming video feeds frame-by-frame, continuously outputting descriptive natural language narratives that mirror human perception.
The primary target of real-time video captioning is to break down the barrier between raw pixel arrays and actionable linguistic insights with minimal latencies. Traditional multimodal pipelines require reading an entire video file into disk memory before passing it to an inference pipeline. By contrast, streaming visual models process temporal context in small, rolling time windows. This architecture allows developers to build responsive monitoring systems, live sports commentaries, assistive technology for visually impaired users, and instant metadata tagging engines for high-volume video platforms.
At a high level, achieving fluid continuous captions requires a carefully orchestrated balance between vision-language model efficiency and frame sampling strategies. Models like Qwen2-VL, enhanced by specialized execution kernels, analyze interleaved visual patches against prompt histories to maintain coherent context without exhausting GPU memory. Combining these deep learning backends with fast frame-extraction libraries and OpenCV rendering gives developers the flexibility to inspect, overlay, and encode generated subtitles directly onto video streams with frame-accurate timing.
Setting Up Your High-Performance Linux Environment for Real-Time Multimodal AI How Do You Prepare Windows for Flash Attention and Liger Kernel Execution? By initializing Linux through WSL and installing CUDA-matched PyTorch binaries along with Liger Kernel and Flash Attention 2, you establish an optimized GPU runtime that prevents memory bottlenecks during real-time video captioning in Python.
Building a production-ready real time video captioning python environment on Windows begins with setting up Windows Subsystem for Linux (WSL). Windows environments often face pathing and driver friction when compiling native C++ attention kernels for vision-language models. WSL provides a native Linux runtime directly on Windows, granting low-overhead access to NVIDIA GPU acceleration while maintaining a seamless developer experience.
Once your Linux distribution is active, managing isolated dependency spaces becomes critical. Vision-language architectures rely on specific framework revisions to prevent API mismatches between image patchers and text tokenizers. By creating a dedicated Anaconda virtual environment, you isolate required packages—such as PyTorch 2.6 built against CUDA 12.6—ensuring that downstream modules like Liger Kernel and Flash Attention 2 compile cleanly without interfering with existing system binaries.
The final phase of environment setup involves installing core model libraries alongside custom streaming utilities. Deep learning tools such as transformers, accelerate, and qwen-vl-utils handle vision-language token generation, while OpenCV and yt-dlp manage frame extraction and video stream ingestion. Completing these installation commands creates a hardware-accelerated pipeline ready to run multimodal inference without hitting system bottlenecks.
# Open Powershell and run wsl for Linux wsl # Clone repo: cd tutorials git clone https : // github . com / showlab / livecc . git cd livecc # create new anaconda env conda create - n livecc python = 3.11 conda activate livecc ! ---------------------------------------------------------------- ! # Install Pytorch nvcc -- version # ROCM 6.1 (Linux only) pip install torch == 2.6 . 0 torchvision == 0.21 . 0 torchaudio == 2.6 . 0 -- index - url https : // download . pytorch . org / whl / rocm6 . 1 # ROCM 6.2.4 (Linux only) pip install torch == 2.6 . 0 torchvision == 0.21 . 0 torchaudio == 2.6 . 0 -- index - url https : // download . pytorch . org / whl / rocm6 . 2 . 4 # CUDA 11.8 pip install torch == 2.6 . 0 torchvision == 0.21 . 0 torchaudio == 2.6 . 0 -- index - url https : // download . pytorch . org / whl / cu118 # CUDA 12.4 pip install torch == 2.6 . 0 torchvision == 0.21 . 0 torchaudio == 2.6 . 0 -- index - url https : // download . pytorch . org / whl / cu124 ############ ----->>>>> CUDA 12.6 pip install torch == 2.6 . 0 torchvision == 0.21 . 0 torchaudio == 2.6 . 0 -- index - url https : // download . pytorch . org / whl / cu126 #################################### # CPU only pip install torch == 2.6 . 0 torchvision == 0.21 . 0 torchaudio == 2.6 . 0 -- index - url https : // download . pytorch . org / whl / cpu ! ---------------------------------------------------------------- ! # install python dependencies : pip install " transformers==4.50.0 " accelerate deepspeed peft opencv - python decord datasets tensorboard " gradio==5.15.0 " pillow - heif gpustat timm sentencepiece openai av == 12.0 . 0 " qwen-vl-utils==0.0.8 " liger - kernel == 0.5 . 5 numpy == 1.24 . 4 " huggingface-hub>=0.26.0 " pip install flash - attn -- no - build - isolation pip install livecc - utils == 0.0 . 2 pip install liger_kernel pip install bitsandbytes pip install yt - dlp # Copy the 3 files to the LiveCC folder : Step1 - LiveCC Inference . py Step2 - LiveCC Inference plus Final video with narration . py Step3 - Youtube_livecc_inference . py Run Vscod : 1 . Run " code . "" 2 . Make sure your working folder is " Livcc " 3 . Choose the livecc enviroment using < Ctrl > < Shift > < p > and select inteperter " livcc " In summary, this installation phase configures your WSL system, builds an isolated Python 3.11 Conda workspace, installs GPU-accelerated PyTorch dependencies, and pulls required computer vision tools into VS Code.
Building the LiveCC Engine Class and Managing Video Frames Dynamically How Does LiveCC Slice Temporal Frame Buffers for Streaming Vision Models? The class initializes smart video readers that slice raw streams into tiny presentation time intervals, passing interleaved visual clips to Qwen2-VL while tracking frame offsets across sequential turns.
The foundation of streaming vision-language processing relies on controlling temporal frame inputs. Rather than loading an entire video file into GPU memory, the LiveCCDemoInfer class establishes a modular sampling architecture. By calculating initial frame buffers (initial_fps_frames) and continuous step sizes (streaming_fps_frames), the model processes dynamic video windows while preserving temporal continuity across inference cycles.
Inside the initialization step, Liger Kernel wrappers patch the underlying Qwen2-VL model execution. Using apply_liger_kernel_to_qwen2_vl(), the architecture drastically optimizes memory usage without compromising accuracy. The system pre-loads auto-processors, configures chat templates, and records exact token offsets so subsequent prompt turns can seamlessly append new video information.
When processing raw video tracks, the live_cc method uses smart-resized video readers to compute presentation timestamps (video_pts). By verifying whether new timestamps exist beyond previously processed bounds, the pipeline extracts precise frame arrays, constructs structured conversation messages (Time=X-Ys), and passes processed inputs into the model generation loop.
Step 1 Script Mechanics: From Imports to Real-Time Streaming Inference To build our real-time video captioning pipeline, the script begins by importing essential system, functional, and PyTorch utilities, alongside progress tracking tools. Right at startup, it directly applies Liger Kernel optimizations to the Qwen2-VL transformer layers. This patching step is critical because it significantly lowers memory consumption during long inference runs. Next, it loads the core Qwen2-VL model classes, auto processors, and specialized LiveCC utilities designed for smart video reading and multimodal input formatting.
With all dependencies in place, we define the core LiveCCDemoInfer class. Here, we configure our streaming parameters: setting a sampling rate of 2 FPS, specifying initial and continuous frame window counts, and automatically calculating the temporal intervals between frames. Upon initialization (__init__), the class loads the pre-trained Qwen2-VL checkpoint onto the GPU with Flash Attention 2 acceleration. It also binds our multimodal input helper, builds the default system prompt, calculates byte offsets for conversation tracking, and sets up a caching dictionary to manage video readers efficiently.
The real heavy lifting happens inside the live_cc generator method. When invoked, it reads the current video timestamp, checks the cache for an existing video reader (or instantiates a smart-resized reader if needed), and extracts presentation timestamps (video_pts). If the current time exceeds the video length or falls within an already processed window, it handles state flags or returns early. Otherwise, it extracts dynamic frame clip tensors, slices them into interleaved temporal windows, and formats them into structured user messages tagged with time bounds (e.g., Time=0.0-3.0s).
During each streaming turn, the method constructs prompt templates, concatenates prior conversation token IDs (past_ids), and pushes both visual and text tensors directly to CUDA memory. It then executes model generation using Flash Attention 2, reusing cached key-values (past_key_values) to prevent redundant computations. Finally, it updates the state dictionary with new key-values and generated token IDs, yielding the time bounds alongside the freshly decoded text commentary string.
To put the pipeline into action, the main execution block sets the target Hugging Face model path (chenjoya/LiveCC-7B-Instruct), specifies the local input video path, and defines a default description prompt. It instantiates LiveCCDemoInfer, prepares an active tracking state dictionary, and sets up a list to accumulate generated commentaries. A temporal loop then steps through the video second-by-second up to a 30-second cap, triggering the live_cc generator to print timestamped captions directly to the terminal, record them into our commentary history, and gracefully break once the end of the video is reached.
import functools , torch , os , tqdm from liger_kernel . transformers import apply_liger_kernel_to_qwen2_vl apply_liger_kernel_to_qwen2_vl () # important. our model is trained with this. keep consistency from transformers import Qwen2VLForConditionalGeneration , AutoProcessor , LogitsProcessor , logging from livecc_utils import prepare_multiturn_multimodal_inputs_for_generation , get_smart_resized_clip , get_smart_resized_video_reader from qwen_vl_utils import process_vision_info class LiveCCDemoInfer : fps = 2 initial_fps_frames = 6 streaming_fps_frames = 2 initial_time_interval = initial_fps_frames / fps streaming_time_interval = streaming_fps_frames / fps frame_time_interval = 1 / fps def __init__ ( self , model_path : str = None , device_id : int = 0 ): self . model = Qwen2VLForConditionalGeneration . from_pretrained ( model_path , torch_dtype = " auto " , device_map = f 'cuda: { device_id } ' , attn_implementation = ' flash_attention_2 ' ) self . processor = AutoProcessor . from_pretrained ( model_path , use_fast =False ) self . model . prepare_inputs_for_generation = functools . partial ( prepare_multiturn_multimodal_inputs_for_generation , self . model ) message = { " role " : " user " , " content " : [ { " type " : " text " , " text " : ' livecc ' }, ] } texts = self . processor . apply_chat_template ([ message ], tokenize =False ) self . system_prompt_offset = texts . index ( ' <|im_start|>user ' ) self . _cached_video_readers_with_hw = {} def live_cc ( self , query : str , state : dict , max_pixels : int = 384 * 28 * 28 , default_query : str = ' Please describe the video. ' , do_sample : bool = False , repetition_penalty : float = 1.05 , ** kwargs , ): """ state: dict, (maybe) with keys: video_path: str, video path video_timestamp: float, current video timestamp last_timestamp: float, last processed video timestamp last_video_pts_index: int, last processed video frame index video_pts: np.ndarray, video pts last_history: list, last processed history past_key_values: llm past_key_values past_ids: past generated ids """ # 1. preparation: video_reader, and last processing info video_timestamp , last_timestamp = state . get ( ' video_timestamp ' , 0 ), state . get ( ' last_timestamp ' , - 1 / self . fps ) video_path = state [ ' video_path ' ] if video_path not in self . _cached_video_readers_with_hw : self . _cached_video_readers_with_hw [ video_path ] = get_smart_resized_video_reader ( video_path , max_pixels ) video_reader = self . _cached_video_readers_with_hw [ video_path ][ 0 ] video_reader . get_frame_timestamp ( 0 ) state [ ' video_pts ' ] = torch . from_numpy ( video_reader . _frame_pts [:, 1 ]) state [ ' last_video_pts_index ' ] = - 1 video_pts = state [ ' video_pts ' ] if last_timestamp + self . frame_time_interval > video_pts [ - 1 ]: state [ ' video_end ' ] = True return video_reader , resized_height , resized_width = self . _cached_video_readers_with_hw [ video_path ] last_video_pts_index = state [ ' last_video_pts_index ' ] # 2. which frames will be processed initialized = last_timestamp >= 0 if not initialized : video_timestamp = max ( video_timestamp , self . initial_time_interval ) if video_timestamp <= last_timestamp + self . frame_time_interval : return timestamps = torch . arange ( last_timestamp + self . frame_time_interval , video_timestamp , self . frame_time_interval ) # add compensation # 3. fetch frames in required timestamps clip , clip_timestamps , clip_idxs = get_smart_resized_clip ( video_reader , resized_height , resized_width , timestamps , video_pts , video_pts_index_from = last_video_pts_index + 1 ) # Added protection: if no new frames are returned, we have hit the end of the video track if len ( clip_idxs ) == 0 : state [ ' video_end ' ] = True return state [ ' last_video_pts_index ' ] = clip_idxs [ - 1 ] state [ ' last_timestamp ' ] = clip_timestamps [ - 1 ] # 4. organize to interleave frames interleave_clips , interleave_timestamps = [], [] if not initialized : interleave_clips . append ( clip [: self . initial_fps_frames ]) interleave_timestamps . append ( clip_timestamps [: self . initial_fps_frames ]) clip = clip [ self . initial_fps_frames :] clip_timestamps = clip_timestamps [ self . initial_fps_frames :] if len ( clip ) > 0 : interleave_clips . extend ( list ( clip . split ( self . streaming_fps_frames ))) interleave_timestamps . extend ( list ( clip_timestamps . split ( self . streaming_fps_frames ))) # 5. make conversation and send to model for clip , timestamps in zip ( interleave_clips , interleave_timestamps ): start_timestamp , stop_timestamp = timestamps [ 0 ]. item (), timestamps [ - 1 ]. item () + self . frame_time_interval message = { " role " : " user " , " content " : [ { " type " : " text " , " text " : f 'Time= { start_timestamp :.1f } - { stop_timestamp :.1f } s' }, { " type " : " video " , " video " : clip } ] } if not query and not state . get ( ' query ' , None ): query = default_query print ( f 'No query provided, use default_query= { default_query } ' ) if query and state . get ( ' query ' , None ) != query : message [ ' content ' ]. append ({ " type " : " text " , " text " : query }) state [ ' query ' ] = query texts = self . processor . apply_chat_template ([ message ], tokenize =False , add_generation_prompt =True , return_tensors = ' pt ' ) past_ids = state . get ( ' past_ids ' , None ) if past_ids is not None : texts = ' <|im_end|> \n ' + texts [ self . system_prompt_offset :] inputs = self . processor ( text = texts , images =None , videos = [ clip ], return_tensors = " pt " , return_attention_mask =True # Set to True to completely resolve the attention mask warning ) inputs . to ( ' cuda ' ) if past_ids is not None : inputs [ ' input_ids ' ] = torch . cat ([ past_ids , inputs . input_ids ], dim = 1 ) outputs = self . model . generate ( ** inputs , past_key_values = state . get ( ' past_key_values ' , None ), return_dict_in_generate =True , do_sample = do_sample , repetition_penalty = repetition_penalty , pad_token_id =self . model . config . eos_token_id , temperature =None , top_p =None , top_k =None # Clear config fallback properties to silence do_sample mismatch warnings ) state [ ' past_key_values ' ] = outputs . past_key_values state [ ' past_ids ' ] = outputs . sequences [:, : - 1 ] yield ( start_timestamp , stop_timestamp ), self . processor . decode ( outputs . sequences [ 0 , inputs . input_ids . size ( 1 ):], skip_special_tokens =True ), state # Main code : model_path = ' chenjoya/LiveCC-7B-Instruct ' video_path = " my-media/cats.mp4 " query = " Please describe the video. " infer = LiveCCDemoInfer ( model_path = model_path ) state = { ' video_path ' : video_path } commentaries = [] t = 0 for t in range ( 31 ): state [ ' video_timestamp ' ] = t for ( start_t , stop_t ), response , state in infer . live_cc ( query = query , state = state , max_pixels = 384 * 28 * 28 , repetition_penalty = 1.05 , ): print ( f ' { start_t } s- { stop_t } s: { response } ' ) commentaries . append ([ start_t , stop_t , response ]) if state . get ( ' video_end ' , False ): break t += 1 In summary, this section constructs the structural LiveCCDemoInfer framework, handling video frame sampling, state preservation across turns, and multimodal conversation formatting for Qwen2-VL.
Adding Interactive GUI Previews and Burning AI Narrations with OpenCV How Do You Sync Dynamic Text Overlay Graphics to Original Video Frame Rates? OpenCV reads the exact timestamp presentation array (video_pts), maps each generated caption to matching frame index bounds, and writes rendered BGR frames into an MP4 file with matching native frame rates.
Generating text descriptions in a terminal window is useful for debugging, but visual video applications require burning captions directly onto image frames. In Step 2, the pipeline introduces live window preview rendering alongside automated post-processing routines using OpenCV. This allows developers to evaluate generated commentaries against source frames while compiling fully subtitled video outputs.
The overlay_text_bottom_left function provides a reusable utility for rendering subtitle overlays. It calculates caption box dimensions based on font scale, draws a dark background rectangle at the bottom-left corner of the image array, and writes crisp white text over it. Simultaneously, during Step 1 preview playback, the script formats top-right timestamp badges (e.g., "0.0s") and updates a GUI window via cv2.imshow().
Step 2 handles frame-accurate video compilation without needing active GUI windows. The script checks the source video’s native frame rate using cv2.VideoCapture and configures a cv2.VideoWriter stream. By looping through each frame index, comparing its timestamp against recorded commentary intervals, and burning corresponding text boxes, OpenCV compiles an MP4 video file with accurately synchronized burned-in subtitles.
Step 2 Script Mechanics: Real-Time Preview Overlays and Hardcoded Subtitle Video Rendering Building upon the core inference engine, this second script introduces OpenCV graphics rendering and video compilation routines. It begins with standard system imports, PyTorch tools, and progress bar utilities. Just like in the previous setup, it immediately patches the Qwen2-VL transformer layers with Liger Kernel optimizations to maintain GPU memory efficiency, then loads the model classes, auto processors, and LiveCC clip utilities.
The script defines the underlying LiveCCDemoInfer class, setting up sampling frame rates (2 FPS), initial window steps, and frame interval calculations. Upon instantiation (__init__), it loads the pre-trained Qwen2-VL model with Flash Attention 2 acceleration, sets up the AutoProcessor, binds multimodal generation utilities, and builds the default chat prompt offsets. Inside the live_cc generator method, incoming video streams are evaluated frame-by-frame: checking reader caches, slicing temporal frame clip tensors, adding timestamp tags (e.g., Time=0.0-3.0s), and generating natural language descriptions using cached transformer key-values (past_key_values).
To bring these commentaries onto the screen, the script introduces a reusable helper function called overlay_text_bottom_left. This utility inspects the dimensions of incoming BGR image matrices, measures the target text size using OpenCV’s cv2.getTextSize, and draws a solid dark background rectangle near the bottom-left corner before burning crisp, anti-aliased white subtitle text onto the frame.
During the primary execution loop (Step 1 of the script), the model instantiates LiveCCDemoInfer and steps through 30 seconds of video. As each commentary segment is generated, the pipeline locates the exact frame matching the start timestamp, converts the raw RGB array into BGR color space, and applies overlay_text_bottom_left. It simultaneously formats a cyan timestamp badge (e.g., "0.0s") anchored to the top-right corner, displaying the composite frame in a dynamic GUI preview window (cv2.imshow) before logging the commentary to a history list.
Once all commentaries are generated and GUI windows are closed, the script enters Step 2: automated video compilation. It opens the source media file with cv2.VideoCapture to extract its native spatial resolution and frame rate (defaulting to 25.0 FPS as a fallback), and configures an OpenCV VideoWriter stream with the MP4V codec. Using a tqdm progress bar, it iterates through every individual frame index in the source video, calculates its presentation timestamp (current_time), and matches it against recorded commentary intervals. The corresponding subtitle text is burned onto the bottom-left corner of the frame array, and the rendered BGR matrix is written directly into an MP4 output file (output_commentary_video.mp4), resulting in a fully encoded, hardcoded subtitle video asset.
import functools , torch , os , tqdm from liger_kernel . transformers import apply_liger_kernel_to_qwen2_vl apply_liger_kernel_to_qwen2_vl () # important. our model is trained with this. keep consistency from transformers import Qwen2VLForConditionalGeneration , AutoProcessor , LogitsProcessor , logging from livecc_utils import prepare_multiturn_multimodal_inputs_for_generation , get_smart_resized_clip , get_smart_resized_video_reader from qwen_vl_utils import process_vision_info class LiveCCDemoInfer : fps = 2 initial_fps_frames = 6 streaming_fps_frames = 2 initial_time_interval = initial_fps_frames / fps streaming_time_interval = streaming_fps_frames / fps frame_time_interval = 1 / fps def __init__ ( self , model_path : str = None , device_id : int = 0 ): self . model = Qwen2VLForConditionalGeneration . from_pretrained ( model_path , torch_dtype = " auto " , device_map = f 'cuda: { device_id } ' , attn_implementation = ' flash_attention_2 ' ) self . processor = AutoProcessor . from_pretrained ( model_path , use_fast =False ) self . model . prepare_inputs_for_generation = functools . partial ( prepare_multiturn_multimodal_inputs_for_generation , self . model ) message = { " role " : " user " , " content " : [ { " type " : " text " , " text " : ' livecc ' }, ] } texts = self . processor . apply_chat_template ([ message ], tokenize =False ) self . system_prompt_offset = texts . index ( ' <|im_start|>user ' ) self . _cached_video_readers_with_hw = {} def live_cc ( self , query : str , state : dict , max_pixels : int = 384 * 28 * 28 , default_query : str = ' Please describe the video. ' , do_sample : bool = False , repetition_penalty : float = 1.05 , ** kwargs , ): """ state: dict, (maybe) with keys: video_path: str, video path video_timestamp: float, current video timestamp last_timestamp: float, last processed video timestamp last_video_pts_index: int, last processed video frame index video_pts: np.ndarray, video pts last_history: list, last processed history past_key_values: llm past_key_values past_ids: past generated ids """ # 1. preparation: video_reader, and last processing info video_timestamp , last_timestamp = state . get ( ' video_timestamp ' , 0 ), state . get ( ' last_timestamp ' , - 1 / self . fps ) video_path = state [ ' video_path ' ] if video_path not in self . _cached_video_readers_with_hw : self . _cached_video_readers_with_hw [ video_path ] = get_smart_resized_video_reader ( video_path , max_pixels ) video_reader = self . _cached_video_readers_with_hw [ video_path ][ 0 ] video_reader . get_frame_timestamp ( 0 ) state [ ' video_pts ' ] = torch . from_numpy ( video_reader . _frame_pts [:, 1 ]) state [ ' last_video_pts_index ' ] = - 1 video_pts = state [ ' video_pts ' ] if last_timestamp + self . frame_time_interval > video_pts [ - 1 ]: state [ ' video_end ' ] = True return video_reader , resized_height , resized_width = self . _cached_video_readers_with_hw [ video_path ] last_video_pts_index = state [ ' last_video_pts_index ' ] # 2. which frames will be processed initialized = last_timestamp >= 0 if not initialized : video_timestamp = max ( video_timestamp , self . initial_time_interval ) if video_timestamp <= last_timestamp + self . frame_time_interval : return timestamps = torch . arange ( last_timestamp + self . frame_time_interval , video_timestamp , self . frame_time_interval ) # add compensation # 3. fetch frames in required timestamps clip , clip_timestamps , clip_idxs = get_smart_resized_clip ( video_reader , resized_height , resized_width , timestamps , video_pts , video_pts_index_from = last_video_pts_index + 1 ) # Added protection: if no new frames are returned, we have hit the end of the video track if len ( clip_idxs ) == 0 : state [ ' video_end ' ] = True return state [ ' last_video_pts_index ' ] = clip_idxs [ - 1 ] state [ ' last_timestamp ' ] = clip_timestamps [ - 1 ] # 4. organize to interleave frames interleave_clips , interleave_timestamps = [], [] if not initialized : interleave_clips . append ( clip [: self . initial_fps_frames ]) interleave_timestamps . append ( clip_timestamps [: self . initial_fps_frames ]) clip = clip [ self . initial_fps_frames :] clip_timestamps = clip_timestamps [ self . initial_fps_frames :] if len ( clip ) > 0 : interleave_clips . extend ( list ( clip . split ( self . streaming_fps_frames ))) interleave_timestamps . extend ( list ( clip_timestamps . split ( self . streaming_fps_frames ))) # 5. make conversation and send to model for clip , timestamps in zip ( interleave_clips , interleave_timestamps ): start_timestamp , stop_timestamp = timestamps [ 0 ]. item (), timestamps [ - 1 ]. item () + self . frame_time_interval message = { " role " : " user " , " content " : [ { " type " : " text " , " text " : f 'Time= { start_timestamp :.1f } - { stop_timestamp :.1f } s' }, { " type " : " video " , " video " : clip } ] } if not query and not state . get ( ' query ' , None ): query = default_query print ( f 'No query provided, use default_query= { default_query } ' ) if query and state . get ( ' query ' , None ) != query : message [ ' content ' ]. append ({ " type " : " text " , " text " : query }) state [ ' query ' ] = query texts = self . processor . apply_chat_template ([ message ], tokenize =False , add_generation_prompt =True , return_tensors = ' pt ' ) past_ids = state . get ( ' past_ids ' , None ) if past_ids is not None : texts = ' <|im_end|> \n ' + texts [ self . system_prompt_offset :] inputs = self . processor ( text = texts , images =None , videos = [ clip ], return_tensors = " pt " , return_attention_mask =True # Set to True to completely resolve the attention mask warning ) inputs . to ( ' cuda ' ) if past_ids is not None : inputs [ ' input_ids ' ] = torch . cat ([ past_ids , inputs . input_ids ], dim = 1 ) outputs = self . model . generate ( ** inputs , past_key_values = state . get ( ' past_key_values ' , None ), return_dict_in_generate =True , do_sample = do_sample , repetition_penalty = repetition_penalty , pad_token_id =self . model . config . eos_token_id , temperature =None , top_p =None , top_k =None # Clear config fallback properties to silence do_sample mismatch warnings ) state [ ' past_key_values ' ] = outputs . past_key_values state [ ' past_ids ' ] = outputs . sequences [:, : - 1 ] yield ( start_timestamp , stop_timestamp ), self . processor . decode ( outputs . sequences [ 0 , inputs . input_ids . size ( 1 ):], skip_special_tokens =True ), state # Main code : import cv2 # Required for displaying the image and saving the video import torch from tqdm import tqdm # Required for the terminal progress bar def overlay_text_bottom_left ( img , text ): """ Helper function to burn text aligned to the bottom-left corner with a dark background box. """ if not text : return img img_h , img_w , _ = img . shape font = cv2 . FONT_HERSHEY_SIMPLEX font_scale = 0.55 font_color = ( 255 , 255 , 255 ) # White thickness = 1 line_type = cv2 . LINE_AA text_position = ( 15 , img_h - 25 ) text_size , _ = cv2 . getTextSize ( text , font , font_scale , thickness ) cv2 . rectangle ( img , ( 10 , img_h - 25 - text_size [ 1 ] - 5 ), ( 15 + text_size [ 0 ] + 5 , img_h - 15 ), ( 0 , 0 , 0 ), - 1 ) cv2 . putText ( img , text , text_position , font , font_scale , font_color , thickness , line_type ) return img model_path = ' chenjoya/LiveCC-7B-Instruct ' video_path = " my-media/cats.mp4 " query = " Please describe the video. " infer = LiveCCDemoInfer ( model_path = model_path ) state = { ' video_path ' : video_path } commentaries = [] t = 0 # A constant window name to ensure frames replace each other in a single window during Step 1 LIVE_WINDOW_NAME = " LiveCC Model Processing Stream " # --- STEP 1: Generate all commentaries and display the first frame of each window --- print ( " Generating commentaries for the video... " ) for t in range ( 31 ): state [ ' video_timestamp ' ] = t for ( start_t , stop_t ), response , state in infer . live_cc ( query = query , state = state , max_pixels = 384 * 28 * 28 , repetition_penalty = 1.05 , ): print ( f 'Generated ( { start_t } s- { stop_t } s): { response } ' ) clean_response = response . replace ( ' \n ' , ' ' ) commentaries . append ({ ' start ' : start_t , ' stop ' : stop_t , ' text ' : clean_response }) # Extract the video reader and timestamps video_reader , _ , _ = infer . _cached_video_readers_with_hw [ video_path ] video_pts = state [ ' video_pts ' ] # Locate the exact frame index corresponding to the start of this timeframe (start_t) live_frame_idx = torch . argmin ( torch . abs ( video_pts - start_t )). item () live_frame_rgb = video_reader . get_batch ([ live_frame_idx ]). asnumpy ()[ 0 ] live_frame_bgr = cv2 . cvtColor ( live_frame_rgb , cv2 . COLOR_RGB2BGR ) # 1. Overlay the description text to the bottom-left corner live_frame_bgr = overlay_text_bottom_left ( live_frame_bgr , clean_response ) # 2. Format and overlay the starting time string (e.g. "0.0s") on the top-right corner time_text = f " { start_t :.1f } s" font = cv2 . FONT_HERSHEY_SIMPLEX font_scale = 0.5 font_color = ( 0 , 255 , 255 ) # Cyan thickness = 1 text_size , _ = cv2 . getTextSize ( time_text , font , font_scale , thickness ) height , width , _ = live_frame_bgr . shape top_right_pos = ( width - text_size [ 0 ] - 15 , 25 ) # Draw background rectangle for the timestamp cv2 . rectangle ( live_frame_bgr , ( width - text_size [ 0 ] - 20 , 10 ), ( width - 10 , 32 ), ( 0 , 0 , 0 ), - 1 ) cv2 . putText ( live_frame_bgr , time_text , top_right_pos , font , font_scale , font_color , thickness , cv2 . LINE_AA ) # Render the first frame of the current window to the active GUI canvas cv2 . imshow ( LIVE_WINDOW_NAME , live_frame_bgr ) cv2 . waitKey ( 1 ) # Refresh window canvas if state . get ( ' video_end ' , False ): break t += 1 cv2 . destroyAllWindows () # --- STEP 2: Compile and Save all frames sequentially (No GUI Playback) --- print ( " \n [LOG] Initializing video rendering process... " ) video_reader , _ , _ = infer . _cached_video_readers_with_hw [ video_path ] video_pts = state [ ' video_pts ' ]. tolist () total_frames = len ( video_pts ) frame_rgb_sample = video_reader . get_batch ([ 0 ]). asnumpy ()[ 0 ] height , width , _ = frame_rgb_sample . shape src_cap = cv2 . VideoCapture ( video_path ) source_fps = src_cap . get ( cv2 . CAP_PROP_FPS ) src_cap . release () if source_fps <= 0 : source_fps = 25.0 print ( f "[WARNING] Could not parse source FPS automatically. Falling back to default: { source_fps } " ) else : print ( f "[LOG] Detected source video properties: Resolution= { width } x { height } , FPS= { source_fps } " ) output_path = " my-media/output_commentary_video.mp4 " fourcc = cv2 . VideoWriter_fourcc ( * ' mp4v ' ) video_writer = cv2 . VideoWriter ( output_path , fourcc , source_fps , ( width , height )) print ( f "[LOG] Processing a total of { total_frames } frames into output video structure. Please wait..." ) for frame_idx in tqdm ( range ( total_frames ), desc = " Compiling Final Video File " ): current_time = video_pts [ frame_idx ] active_text = "" for segment in commentaries : if segment [ ' start ' ] <= current_time < segment [ ' stop ' ]: active_text = segment [ ' text ' ] break frame_rgb = video_reader . get_batch ([ frame_idx ]). asnumpy ()[ 0 ] frame_bgr = cv2 . cvtColor ( frame_rgb , cv2 . COLOR_RGB2BGR ) # Burn the bottom-left description box only. Top-right timestamp is skipped to keep output file clean frame_bgr = overlay_text_bottom_left ( frame_bgr , active_text ) video_writer . write ( frame_bgr ) video_writer . release () print ( f " \n [LOG] Finished compiling output video successfully! File saved to: { output_path } " ) In summary, this script introduces real-time visual feedback using cv2.imshow(), overlays styled text and dynamic timestamp boxes, and uses cv2.VideoWriter to render fully subtitled MP4 files.
Streaming YouTube Videos Directly with yt-dlp Auto-Captioning How Does the Pipeline Process Live YouTube URLs Without Manual Video Downloading? yt-dlp extracts and streams the video directly into memory using H.264/AVC format selection, saving the temporary file locally before passing it straight to the LiveCC inference engine.
To build a truly versatile real time video captioning python application, the pipeline must ingest online streaming video directly from public web links. Step 3 extends the system by integrating yt-dlp, enabling seamless stream ingestion from YouTube videos and YouTube Shorts URLs without requiring manual downloading or external media tools.
The download_youtube_video helper function wraps yt-dlp with targeted configuration flags. Standard YouTube video streams often default to modern container codecs like AV1 or VP9, which can cause frame decoding errors in PyTorch vision readers. By specifying format preferences (bestvideo[vcodec*=avc1]+bestaudio[acodec*=mp4a]/best[ext=mp4]/best), yt-dlp guarantees the download of H.264/AVC formatted MP4 files into your local directory.
Once downloaded, the local file path is passed directly into the LiveCCDemoInfer state dictionary. The script runs the same visual preview and subtitle rendering passes established in Step 2, auto-captioning public web video content and compiling a fully rendered MP4 video file automatically.
Step 3 Script Mechanics: End-to-End YouTube Stream Downloader, Live Captioning, and Subtitle Video Generation The final script expands our real-time video captioning pipeline into an end-to-end automation engine capable of ingesting public web video directly from YouTube URLs. It begins by assembling all core dependencies: system utilities, PyTorch, Liger Kernel wrappers, Qwen2-VL classes, LiveCC clip tools, OpenCV rendering libraries, progress bar utilities, and yt-dlp for web media extraction. At execution start, it immediately applies Liger Kernel patches to Qwen2-VL transformer layers to keep VRAM consumption minimal throughout the streaming workflow.
At its structural core, the script relies on the same LiveCCDemoInfer class as earlier steps, configuring a 2 FPS sampling rate, calculating temporal step durations, and initializing pre-trained Qwen2-VL weights on GPU with Flash Attention 2 acceleration. Inside the live_cc generator method, incoming video frames are sliced into interleaved temporal clips, tagged with timestamp bounds (e.g., Time=0.0-3.0s), and processed into natural language commentaries using cached transformer key-values (past_key_values).
The key extension in this script is the download_youtube_video utility function. When provided with a YouTube video or Shorts URL, it creates a local output directory and initializes yt-dlp with targeted format options (bestvideo[vcodec*=avc1]). This enforces the download of H.264/AVC formatted MP4 files, preventing frame decoding failures that often occur when PyTorch and OpenCV try to read modern container codecs like AV1 or VP9.
Once the YouTube video is saved locally, the main pipeline instantiates LiveCCDemoInfer and initiates a 30-second inference pass. As commentary segments are generated, OpenCV’s overlay_text_bottom_left helper function burns white caption boxes onto frame arrays while rendering dynamic top-right cyan timestamps in a live GUI window (cv2.imshow). After previewing, the script initializes a cv2.VideoWriter stream matched to the downloaded video’s native resolution and frame rate, sequentially mapping generated text entries to matching frame indices and exporting a fully rendered MP4 video file (output_Youtube_video.mp4) automatically.
import functools , torch , os , tqdm from liger_kernel . transformers import apply_liger_kernel_to_qwen2_vl apply_liger_kernel_to_qwen2_vl () # important. our model is trained with this. keep consistency from transformers import Qwen2VLForConditionalGeneration , AutoProcessor , LogitsProcessor , logging from livecc_utils import prepare_multiturn_multimodal_inputs_for_generation , get_smart_resized_clip , get_smart_resized_video_reader from qwen_vl_utils import process_vision_info import cv2 # Required for displaying the image and saving the video from tqdm import tqdm # Required for the terminal progress bar import yt_dlp # Added to handle YouTube downloads class LiveCCDemoInfer : fps = 2 initial_fps_frames = 6 streaming_fps_frames = 2 initial_time_interval = initial_fps_frames / fps streaming_time_interval = streaming_fps_frames / fps frame_time_interval = 1 / fps def __init__ ( self , model_path : str = None , device_id : int = 0 ): self . model = Qwen2VLForConditionalGeneration . from_pretrained ( model_path , torch_dtype = " auto " , device_map = f 'cuda: { device_id } ' , attn_implementation = ' flash_attention_2 ' ) self . processor = AutoProcessor . from_pretrained ( model_path , use_fast =False ) self . model . prepare_inputs_for_generation = functools . partial ( prepare_multiturn_multimodal_inputs_for_generation , self . model ) message = { " role " : " user " , " content " : [ { " type " : " text " , " text " : ' livecc ' }, ] } texts = self . processor . apply_chat_template ([ message ], tokenize =False ) self . system_prompt_offset = texts . index ( ' <|im_start|>user ' ) self . _cached_video_readers_with_hw = {} def live_cc ( self , query : str , state : dict , max_pixels : int = 384 * 28 * 28 , default_query : str = ' Please describe the video. ' , do_sample : bool = False , repetition_penalty : float = 1.05 , ** kwargs , ): video_timestamp , last_timestamp = state . get ( ' video_timestamp ' , 0 ), state . get ( ' last_timestamp ' , - 1 / self . fps ) video_path = state [ ' video_path ' ] if video_path not in self . _cached_video_readers_with_hw : self . _cached_video_readers_with_hw [ video_path ] = get_smart_resized_video_reader ( video_path , max_pixels ) video_reader = self . _cached_video_readers_with_hw [ video_path ][ 0 ] video_reader . get_frame_timestamp ( 0 ) state [ ' video_pts ' ] = torch . from_numpy ( video_reader . _frame_pts [:, 1 ]) state [ ' last_video_pts_index ' ] = - 1 video_pts = state [ ' video_pts ' ] if last_timestamp + self . frame_time_interval > video_pts [ - 1 ]: state [ ' video_end ' ] = True return video_reader , resized_height , resized_width = self . _cached_video_readers_with_hw [ video_path ] last_video_pts_index = state [ ' last_video_pts_index ' ] initialized = last_timestamp >= 0 if not initialized : video_timestamp = max ( video_timestamp , self . initial_time_interval ) if video_timestamp <= last_timestamp + self . frame_time_interval : return timestamps = torch . arange ( last_timestamp + self . frame_time_interval , video_timestamp , self . frame_time_interval ) clip , clip_timestamps , clip_idxs = get_smart_resized_clip ( video_reader , resized_height , resized_width , timestamps , video_pts , video_pts_index_from = last_video_pts_index + 1 ) if len ( clip_idxs ) == 0 : state [ ' video_end ' ] = True return state [ ' last_video_pts_index ' ] = clip_idxs [ - 1 ] state [ ' last_timestamp ' ] = clip_timestamps [ - 1 ] interleave_clips , interleave_timestamps = [], [] if not initialized : interleave_clips . append ( clip [: self . initial_fps_frames ]) interleave_timestamps . append ( clip_timestamps [: self . initial_fps_frames ]) clip = clip [ self . initial_fps_frames :] clip_timestamps = clip_timestamps [ self . initial_fps_frames :] if len ( clip ) > 0 : interleave_clips . extend ( list ( clip . split ( self . streaming_fps_frames ))) interleave_timestamps . extend ( list ( clip_timestamps . split ( self . streaming_fps_frames ))) for clip , timestamps in zip ( interleave_clips , interleave_timestamps ): start_timestamp , stop_timestamp = timestamps [ 0 ]. item (), timestamps [ - 1 ]. item () + self . frame_time_interval message = { " role " : " user " , " content " : [ { " type " : " text " , " text " : f 'Time= { start_timestamp :.1f } - { stop_timestamp :.1f } s' }, { " type " : " video " , " video " : clip } ] } if not query and not state . get ( ' query ' , None ): query = default_query print ( f 'No query provided, use default_query= { default_query } ' ) if query and state . get ( ' query ' , None ) != query : message [ ' content ' ]. append ({ " type " : " text " , " text " : query }) state [ ' query ' ] = query texts = self . processor . apply_chat_template ([ message ], tokenize =False , add_generation_prompt =True , return_tensors = ' pt ' ) past_ids = state . get ( ' past_ids ' , None ) if past_ids is not None : texts = ' <|im_end|> \n ' + texts [ self . system_prompt_offset :] inputs = self . processor ( text = texts , images =None , videos = [ clip ], return_tensors = " pt " , return_attention_mask =True ) inputs . to ( ' cuda ' ) if past_ids is not None : inputs [ ' input_ids ' ] = torch . cat ([ past_ids , inputs . input_ids ], dim = 1 ) outputs = self . model . generate ( ** inputs , past_key_values = state . get ( ' past_key_values ' , None ), return_dict_in_generate =True , do_sample = do_sample , repetition_penalty = repetition_penalty , pad_token_id =self . model . config . eos_token_id , temperature =None , top_p =None , top_k =None ) state [ ' past_key_values ' ] = outputs . past_key_values state [ ' past_ids ' ] = outputs . sequences [:, : - 1 ] yield ( start_timestamp , stop_timestamp ), self . processor . decode ( outputs . sequences [ 0 , inputs . input_ids . size ( 1 ):], skip_special_tokens =True ), state def overlay_text_bottom_left ( img , text ): """ Helper function to burn text aligned to the bottom-left corner with a dark background box. """ if not text : return img img_h , img_w , _ = img . shape font = cv2 . FONT_HERSHEY_SIMPLEX font_scale = 0.55 font_color = ( 255 , 255 , 255 ) # White thickness = 1 line_type = cv2 . LINE_AA text_position = ( 15 , img_h - 25 ) text_size , _ = cv2 . getTextSize ( text , font , font_scale , thickness ) cv2 . rectangle ( img , ( 10 , img_h - 25 - text_size [ 1 ] - 5 ), ( 15 + text_size [ 0 ] + 5 , img_h - 15 ), ( 0 , 0 , 0 ), - 1 ) cv2 . putText ( img , text , text_position , font , font_scale , font_color , thickness , line_type ) return img def download_youtube_video ( url : str , output_dir : str = " my-media " ) -> str : """ Downloads a YouTube video/Short to a local folder and returns its file path. """ os . makedirs ( output_dir , exist_ok =True ) ydl_opts = { # Forces yt-dlp to find H.264/AVC video (avc1) + AAC audio, avoiding unsupported AV1/VP9 ' format ' : ' bestvideo[vcodec*=avc1]+bestaudio[acodec*=mp4a]/best[ext=mp4]/best ' , ' outtmpl ' : os . path . join ( output_dir , ' %(id)s . %(ext)s ' ), ' quiet ' : False , ' no_warnings ' : True , } with yt_dlp . YoutubeDL ( ydl_opts ) as ydl : info_dict = ydl . extract_info ( url , download =True ) filename = ydl . prepare_filename ( info_dict ) return filename # --- Config & Initialization --- model_path = ' chenjoya/LiveCC-7B-Instruct ' youtube_url = " https://youtu.be/6U8ipxSRAUA?si=i6c56DClN4ZY92hT " query = " Please describe the video. " print ( f "[LOG] Fetching and downloading YouTube Video: { youtube_url } " ) video_path = download_youtube_video ( youtube_url ) print ( f "[LOG] Saved video locally to: { video_path } " ) infer = LiveCCDemoInfer ( model_path = model_path ) state = { ' video_path ' : video_path } commentaries = [] t = 0 # A constant window name to ensure frames replace each other in a single window during Step 1 LIVE_WINDOW_NAME = " LiveCC Model Processing Stream " # --- STEP 1: Generate all commentaries and display the first frame of each window --- print ( " Generating commentaries for the video... " ) for t in range ( 31 ): state [ ' video_timestamp ' ] = t for ( start_t , stop_t ), response , state in infer . live_cc ( query = query , state = state , max_pixels = 384 * 28 * 28 , repetition_penalty = 1.05 , ): print ( f 'Generated ( { start_t } s- { stop_t } s): { response } ' ) clean_response = response . replace ( ' \n ' , ' ' ) commentaries . append ({ ' start ' : start_t , ' stop ' : stop_t , ' text ' : clean_response }) # Extract the video reader and timestamps video_reader , _ , _ = infer . _cached_video_readers_with_hw [ video_path ] video_pts = state [ ' video_pts ' ] # Locate the exact frame index corresponding to the start of this timeframe (start_t) live_frame_idx = torch . argmin ( torch . abs ( video_pts - start_t )). item () live_frame_rgb = video_reader . get_batch ([ live_frame_idx ]). asnumpy ()[ 0 ] live_frame_bgr = cv2 . cvtColor ( live_frame_rgb , cv2 . COLOR_RGB2BGR ) # 1. Overlay the description text to the bottom-left corner live_frame_bgr = overlay_text_bottom_left ( live_frame_bgr , clean_response ) # 2. Format and overlay the starting time string (e.g. "0.0s") on the top-right corner time_text = f " { start_t :.1f } s" font = cv2 . FONT_HERSHEY_SIMPLEX font_scale = 0.5 font_color = ( 0 , 255 , 255 ) # Cyan thickness = 1 text_size , _ = cv2 . getTextSize ( time_text , font , font_scale , thickness ) height , width , _ = live_frame_bgr . shape top_right_pos = ( width - text_size [ 0 ] - 15 , 25 ) # Draw background rectangle for the timestamp cv2 . rectangle ( live_frame_bgr , ( width - text_size [ 0 ] - 20 , 10 ), ( width - 10 , 32 ), ( 0 , 0 , 0 ), - 1 ) cv2 . putText ( live_frame_bgr , time_text , top_right_pos , font , font_scale , font_color , thickness , cv2 . LINE_AA ) # Render the first frame of the current window to the active GUI canvas cv2 . imshow ( LIVE_WINDOW_NAME , live_frame_bgr ) cv2 . waitKey ( 1 ) # Refresh window canvas if state . get ( ' video_end ' , False ): break t += 1 cv2 . destroyAllWindows () # --- STEP 2: Compile and Save all frames sequentially (No GUI Playback) --- print ( " \n [LOG] Initializing video rendering process... " ) video_reader , _ , _ = infer . _cached_video_readers_with_hw [ video_path ] video_pts = state [ ' video_pts ' ]. tolist () total_frames = len ( video_pts ) frame_rgb_sample = video_reader . get_batch ([ 0 ]). asnumpy ()[ 0 ] height , width , _ = frame_rgb_sample . shape src_cap = cv2 . VideoCapture ( video_path ) source_fps = src_cap . get ( cv2 . CAP_PROP_FPS ) src_cap . release () if source_fps <= 0 : source_fps = 25.0 print ( f "[WARNING] Could not parse source FPS automatically. Falling back to default: { source_fps } " ) else : print ( f "[LOG] Detected source video properties: Resolution= { width } x { height } , FPS= { source_fps } " ) output_path = " my-media/output_Youtube_video.mp4 " fourcc = cv2 . VideoWriter_fourcc ( * ' mp4v ' ) video_writer = cv2 . VideoWriter ( output_path , fourcc , source_fps , ( width , height )) print ( f "[LOG] Processing a total of { total_frames } frames into output video structure. Please wait..." ) for frame_idx in tqdm ( range ( total_frames ), desc = " Compiling Final Video File " ): current_time = video_pts [ frame_idx ] active_text = "" for segment in commentaries : if segment [ ' start ' ] <= current_time < segment [ ' stop ' ]: active_text = segment [ ' text ' ] break frame_rgb = video_reader . get_batch ([ frame_idx ]). asnumpy ()[ 0 ] frame_bgr = cv2 . cvtColor ( frame_rgb , cv2 . COLOR_RGB2BGR ) # Burn the bottom-left description box only. frame_bgr = overlay_text_bottom_left ( frame_bgr , active_text ) video_writer . write ( frame_bgr ) video_writer . release () print ( f " \n [LOG] Finished compiling output video successfully! File saved to: { output_path } " ) In summary, this complete pipeline automates YouTube stream downloading via yt-dlp using targeted H.264 video codec configurations and connects online URLs directly into LiveCC inference and OpenCV video compilation passes.
Frequently Asked Questions (FAQ) What is real time video captioning in Python? Real time video captioning in Python uses vision-language models like Qwen2-VL to analyze video streams frame-by-frame and generate continuous natural language subtitles as playback occurs.
Why use WSL instead of native Windows for LiveCC? WSL provides a Linux environment required to compile native C++ execution kernels like Flash Attention 2 and Liger Kernel, which drastically reduce GPU memory usage.
How does LiveCC maintain memory efficiency during long videos? LiveCC caches historical transformer key-values (past_key_values) and process tokens, appending new frame predictions without reprocessing the entire video history.
What visual models are supported in this pipeline? The pipeline uses Qwen2-VL-7B-Instruct via the LiveCC wrapper, but it can be adapted to other multimodal architectures that accept interleaved vision-text tokens.
Why does yt-dlp specify the H.264/AVC codec format? YouTube often serves video in AV1 or VP9 formats, which can cause frame decoding errors in PyTorch and OpenCV video readers. Forcing H.264 ensures maximum system compatibility.
How does OpenCV handle subtitle rendering on output files? OpenCV reads presentation timestamps (video_pts), maps generated text commentaries to corresponding frame indices, and writes rendered BGR frames to an MP4 video using cv2.VideoWriter.
Can I run this pipeline on a mid-range consumer GPU? Yes, applying Liger Kernel optimizations alongside Flash Attention 2 lowers VRAM requirements, enabling 7B vision-language model inference on GPUs with 12GB to 16GB of VRAM.
What happens if cv2.VideoCapture fails to detect the video FPS? The code includes a safety fallback mechanism that defaults to 25.0 FPS if source frame rate metadata cannot be parsed automatically.
How do I customize the text caption position on the video? You can modify the pixel coordinate tuples in the overlay_text_bottom_left helper function to change text placement, font size, background box margins, or color values.
Can this script process live RTSP camera feeds? Yes, by swapping the local media file path or YouTube downloader with an OpenCV RTSP stream capture handle, you can process live security or camera feeds.
Conclusion Building a production-grade real time video captioning python application bridges the gap between raw pixel arrays and continuous natural language comprehension. Throughout this tutorial, we configured a high-performance WSL development environment, integrated Liger Kernel optimizations with Qwen2-VL, and constructed a dynamic streaming inference loop via LiveCC. We then implemented live preview windows, formatted bottom-left caption boxes using OpenCV, and automated video streaming directly from YouTube URLs with yt-dlp.
These software patterns provide a strong foundation for building multi-modal video applications on private hardware. Whether you are developing live sports analysis systems, automated accessibility tools, or continuous media tagging engines, combining streaming vision-language models with OpenCV rendering delivers powerful computer vision workflows.
Connect ☕ Buy me a coffee — https://ko-fi.com/eranfeit
🖥️ Email : feitgemel@gmail.com
🌐 https://eranfeit.net
🤝 Fiverr : https://www.fiverr.com/s/mB3Pbb
Enjoy,
Eran
 Skip to content