Last Updated on 09/08/2026 by Eran Feit
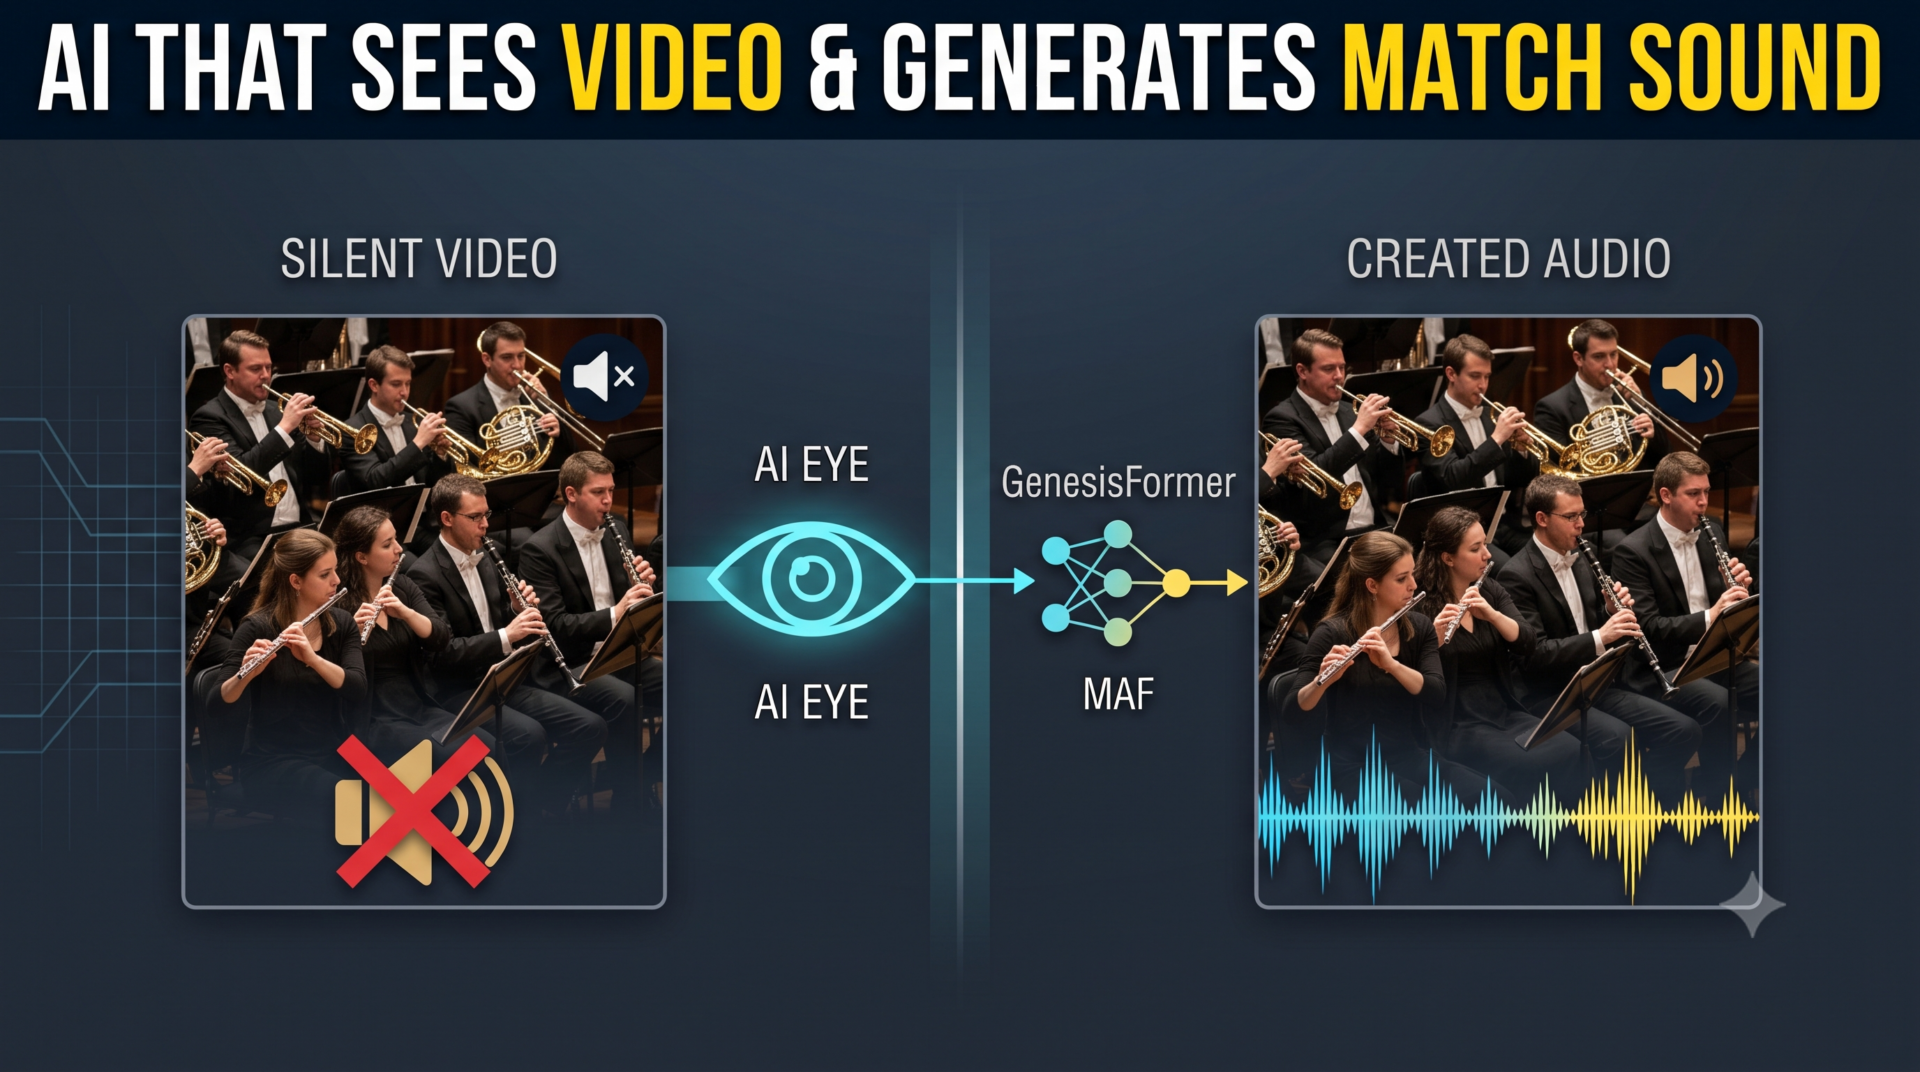
Video to audio AI transforms how we create sound for visual content, taking a stunning clip—a roaring ocean wave, a busy city street, or a cinematic drone shot—and making it truly immersive. Sound is what brings static footage to life, but traditional sound design requires hours of searching for stock audio, manually aligning sound effects, and fine-tuning timelines. This guide walks you through a modern solution using AudioX , an advanced open-source generative framework that automatically analyzes visual video frames and synthesizes perfectly synchronized, high-fidelity audio from scratch.
By working through this tutorial, you will gain practical, hands-on mastery over state-of-the-art multimodal AI generation. Instead of relying on expensive third-party SaaS platforms or generic pre-recorded audio libraries, you will learn how to build and execute a complete video to audio AI pipeline directly on your local machine using Python, PyTorch, and WSL. This gives you total control over the AI sound design workflow, allowing you to generate custom audio, tailored sound effects, and background scoring for any video format at zero cost.
We achieve this by dissecting every technical layer of the AudioX architecture and codebase. Step by step, you will configure a high-performance Linux workspace on Windows, automate model downloads from Hugging Face, and load advanced neural components like the Multimodal Adaptive Fusion (MAF) module and the SynchFormer temporal feature extractor. You will explore how visual tokens are mapped to audio waveforms in real time through diffusion transformers, enabling precise alignment between visual actions and generated sound.
Finally, you will execute production-grade Python scripts that handle end-to-end processing—from raw video frame ingestion to final MP4 video export with integrated audio tracks. Whether you are a machine learning engineer wanting to understand multimodal diffusion, a developer building media automation tools, or a video creator seeking open-source generative tools, this comprehensive walkthrough provides the exact environment setup, code explanations, and architectural insights needed to deploy video to audio AI successfully.
How Video to Audio AI Works Behind the Scenes Video to audio AI represents a major leap forward in generative artificial intelligence, moving beyond simple text-to-speech or basic audio synthesis into the realm of true cross-modal understanding. At its core, the technology allows deep learning models to “see” motion, actions, and scene context within individual video frames and translate those visual patterns into corresponding acoustic waveforms. By evaluating frame rate, motion vectors, and visual semantics simultaneously, the model predicts not only what type of sound should be present—such as footsteps, engine revs, or ambient wind—but precisely when each sound event must start and stop to achieve sub-frame synchronization.
To accomplish this, modern frameworks like AudioX rely on sophisticated neural architectures that combine spatial feature extraction with temporal alignment modules. Visual frames are processed through visual transformers and specialized feature extractors like SynchFormer, which convert physical movement into rich embedding representations. These visual embeddings are then fed into fusion mechanisms—such as the Multimodal Adaptive Fusion (MAF) module—where they interact with optional text prompts or guide audio. A diffusion transformer (MMDiT) then iteratively denoises a random noise tensor, guided by these fused visual and textual conditions, until a clean, high-fidelity audio waveform emerges.
This visual-to-acoustic mapping expands far beyond basic sound effects, serving as a powerful video to music ai generator as well. Whether you need realistic Foley sound effects for action shots, atmospheric environmental noise for cinematic scenes, or custom instrumental music tailored to the emotional pacing of a video, video to audio AI adapts to your creative direction. Understanding how to leverage these open-source pipelines gives technical creators an immense advantage, unlocking fully automated, intelligent sound design without relying on manual audio editing.
Video to Audio AI: Turn Silent Clips into Audio 9 Building an End-to-End Video to Audio AI Pipeline in Python How can a Python script analyze raw visual frames and synthesize perfectly synchronized audio for a silent video? By combining deep learning feature extractors with diffusion models, the code processes video inputs frame by frame, maps visual motion to temporal audio embeddings, and outputs a complete MP4 video with custom-generated sound.
Video to audio AI opens up powerful possibilities for automated sound design, allowing developers and creators to convert silent footage into rich, multi-layered audio experiences programmatically. Instead of relying on pre-recorded stock audio or manual timeline alignment, the Python code showcased in this tutorial implements the AudioX architecture to evaluate the visual rhythm and semantic context of your input video. By automating the extraction of visual features and fusing them with textual prompts, the script dynamically generates matched sound effects, atmospheric scores, or background tracks tailored directly to your video’s content.
At the heart of this codebase is a hybrid loading and execution pipeline designed for efficiency and flexibility. The script dynamically detects whether trained model checkpoints—including the AudioX-MAF and AudioX-MAF-MMDiT variants—are cached locally or need to be fetched from Hugging Face. Once initialized, the code loads the targeted neural modules into GPU memory via PyTorch, setting up precision settings and sampling parameters required to run stable generative diffusion directly within a Linux or WSL environment.
The real technical magic happens inside the conditioning stage, where raw video frames are ingested and encoded. Using specialized neural sub-modules like SynchFormer , the script converts frame sequences into temporal visual embeddings that capture physical motion and action timing. These visual cues are passed into the Multimodal Adaptive Fusion (MAF) module alongside optional text guidance or reference audio. A diffusion transformer (MMDiT) then runs an iterative denoising process over 250 steps, transforming pure Gaussian noise into high-fidelity, 16-bit PCM audio tensors aligned to the video’s exact duration.
Finally, the script automates the complete post-processing and export workflow, bridging raw deep learning tensors with usable media files. It normalizes and formats the generated audio tensor, exports it as a high-quality WAV file, and uses low-level video processing tools to merge the new soundtrack directly with the original silent MP4 container. By working through this step-by-step codebase, you will gain a complete, reusable Python framework capable of running localized, zero-cost video to audio AI inference on your own hardware.
Link to the tutorial here .
Download the code for the tutorial here or here .
Link for Medium users here
Master Computer Vision
Follow my latest tutorials and AI insights on my
Personal Blog .
Beginner Complete CV Bootcamp
Foundation using PyTorch & TensorFlow.
Get Started → Interactive Deep Learning with PyTorch
Hands-on practice in an interactive environment.
Start Learning → Advanced Modern CV: GPT & OpenCV4
Vision GPT and production-ready models.
Go Advanced →
Video to Audio AI: Turn Silent Clips into Audio 10
Setting Up Your WSL Environment and Installing Core AudioX Dependencies Video to audio AI workflows require a robust Linux-based environment to handle complex multi-modal dependencies efficiently. Setting up Windows Subsystem for Linux (WSL) ensures seamless execution of Linux-native packages without dual-booting. Within this environment, isolated virtual environments allow precise package management, preventing version conflicts between PyTorch, CUDA binaries, and specialized sound libraries.
Preparing your system starts with cloning the repository directly from GitHub into your local workspace. Managing modern deep learning frameworks demands specific software versions to ensure hardware acceleration functions properly. By leveraging Anaconda, you create a controlled Python runtime tailored for multi-modal synthesis, which guarantees stable performance during audio diffusion processes.
In addition to core Python packages, installing essential system-level utilities like FFmpeg and libsndfile is critical for reading and exporting media files. These tools handle low-level container remuxing, audio resampling, and frame extraction required during video to audio AI processing. Setting up these dependencies beforehand streamlines the model execution pipeline.
Why is WSL required for running AudioX efficiently on Windows? WSL provides a native Linux kernel environment inside Windows, enabling full compatibility with CUDA, FFmpeg, and Linux-compiled PyTorch dependencies required for real-time video to audio AI processing.
### Open Powershell and run wsl for Linux wsl ### Navigate to working directory and clone repository cd tutorials git clone https://github.com/ZeyueT/AudioX.git cd AudioX ### Create dedicated Anaconda environment with Python 3.8 conda create -n AudioX python= 3.8 .20 conda activate AudioX ### Install Python dependencies and system media libraries pip install git+https://github.com/ZeyueT/AudioX.git conda install -c conda-forge ffmpeg libsndfile pip install omegaconf pip install timm By completing the installation steps, you establish a high-performance environment configured specifically for multimodal generative AI tasks on your local workstation.
Fetching Model Weights and Setting Up VS Code Runtime Fetching pretrained checkpoints is necessary to perform offline inference without re-downloading large neural network parameters on every run. AudioX provides multiple specialized model variants tailored for generic sound, Multimodal Adaptive Fusion (MAF), and Multi-Model Diffusion Transformer (MMDiT) synthesis.
The download process organizes checkpoints into local subdirectories representing distinct architecture capabilities. Obtaining additional auxiliary weights, such as SynchFormer for frame synchronization and VAE for latent audio decoding, ensures the complete generative pipeline operates offline reliably.
Configuring Visual Studio Code to attach to your dedicated Anaconda environment allows seamless debugging and script execution. Selecting the correct Python interpreter within VS Code guarantees that all imported PyTorch and CUDA bindings resolve without environment path errors.
Why are separate model checkpoints required for AudioX, MAF, and MMDiT? Each model checkpoint represents a distinct architecture variant: base AudioX handles general audio, MAF introduces cross-modal fusion, and MMDiT provides advanced diffusion transformer scoring.
### Download pretrained checkpoints and create directory structure mkdir -p model ### Download AudioX base model checkpoints mkdir -p model/AudioX wget https://huggingface.co/HKUSTAudio/AudioX/resolve/main/model.ckpt -O model/AudioX/model.ckpt wget https://huggingface.co/HKUSTAudio/AudioX/resolve/main/config.json -O model/AudioX/config.json ### Download AudioX-MAF checkpoint files mkdir -p model/AudioX-MAF wget https://huggingface.co/HKUSTAudio/AudioX-MAF/resolve/main/model.ckpt -O model/AudioX-MAF/model.ckpt wget https://huggingface.co/HKUSTAudio/AudioX-MAF/resolve/main/config.json -O model/AudioX-MAF/config.json ### Download AudioX-MAF-MMDiT checkpoint files mkdir -p model/AudioX-MAF-MMDiT wget https://huggingface.co/HKUSTAudio/AudioX-MAF-MMDiT/resolve/main/model.ckpt -O model/AudioX-MAF-MMDiT/model.ckpt wget https://huggingface.co/HKUSTAudio/AudioX-MAF-MMDiT/resolve/main/config.json -O model/AudioX-MAF-MMDiT/config.json ### Download SynchFormer and VAE feature modules wget https://huggingface.co/HKUSTAudio/AudioX-MAF/resolve/main/synchformer_state_dict.pth -O model/synchformer_state_dict.pth wget https://huggingface.co/HKUSTAudio/AudioX-MAF-MMDiT/resolve/main/VAE.ckpt -O model/VAE.ckpt Having pre-cached all model checkpoints locally, your setup is now ready for programmatic inference without remote network latency.
Initializing Hybrid Model Loading and Auxiliary Dependencies Here are the test videos for the tutorial : Building a resilient video to audio AI script requires dynamic fallback logic during model initialization. The script first checks for local configuration files and checkpoint weights, loading them directly into memory to bypass network downloads.
An auxiliary dependency verifier automatically checks for vital components like VAE checkpoints and SynchFormer state dictionaries before model instantiation. If missing, the script fetches these hardcoded dependencies programmatically, preventing mid-execution runtime crashes.
Once weights are validated, PyTorch automatically detects available CUDA hardware, offloading model computations to GPU memory. Extracting configuration parameters such as sample rate, target FPS, and audio length sets the exact dimension boundaries for audio generation. This versatile visual-to-acoustic pipeline serves effectively as a video to music ai generator when configured with musical prompt guidance.
How does the hybrid model loader handle missing local files? The hybrid loader inspects local directory paths for configuration and checkpoint files; if absent, it gracefully falls back to pulling pretrained weights directly from Hugging Face repositories.
### Import core system, web, and PyTorch libraries import os import json import urllib.request import torch import torchaudio from einops import rearrange ### Import AudioX model factory and inference utilities from audiox import get_pretrained_model from audiox.models.factory import create_model_from_config from audiox.inference.generation import generate_diffusion_cond from audiox.data.utils import ( read_video, merge_video_audio, load_and_process_audio, encode_video_with_synchformer ) ### Define internal parameters and dynamic target model selection SELECTED_MODEL = " AudioX-MAF-MMDiT " ### Define input file paths, prompts, and diffusion step parameters video_path = " example/V2A_sample-1.mp4 " text_prompt = " Generate music for the video " audio_path = None steps = 250 ### Build dynamic local paths and output file names model_name_full = f " HKUSTAudio/{SELECTED_MODEL} " local_model_dir = os.path.join ( "model" , SELECTED_MODEL ) local_config_path = os.path.join ( local_model_dir, " config.json " ) local_ckpt_path = os.path.join ( local_model_dir, " model.ckpt " ) output_wav_path = f " output_{SELECTED_MODEL}.wav " output_mp4_path = f " output_{SELECTED_MODEL}.mp4 " ### Define auxiliary dependency verification function to fetch missing VAE weights def ensure_auxiliary_dependencies () : """Download missing hardcoded model components (like VAE) if missing.""" os.makedirs( "model" , exist_ok=True ) deps = { "model/VAE.ckpt" : " https://huggingface.co/HKUSTAudio/AudioX-MAF-MMDiT/resolve/main/VAE.ckpt " , "model/synchformer_state_dict.pth" : " https://huggingface.co/HKUSTAudio/AudioX-MAF/resolve/main/synchformer_state_dict.pth " } for path, url in deps.items () : if not os.path.exists ( path ) : print (f "--> [Auto-Download] Downloading missing dependency: {path}..." , flush=True ) urllib.request.urlretrieve(url, path ) print (f "--> [Auto-Download] Download completed: {path}" , flush=True ) ### Verify required secondary files exist before model load ensure_auxiliary_dependencies () ### Configure CUDA GPU compute device if available device = "cuda" if torch.cuda.is_available () else "cpu" print (f "--> Using device: {device.upper()}" , flush=True ) print (f "--> Selected Model Target: {SELECTED_MODEL}" , flush=True ) ### Check local model weights presence for offline initialization has_local_files = os.path.exists ( local_config_path ) and os.path.exists ( local_ckpt_path ) ### Load model locally or trigger remote fallback download if has_local_files: print (f "--> Loading local model files from: {local_model_dir}..." , flush=True ) with open ( local_config_path, " r " ) as f: model_config = json.load ( f ) model = create_model_from_config ( model_config ) ckpt = torch.load ( local_ckpt_path, map_location= " cpu " ) if "state_dict" in ckpt: model.load_state_dict(ckpt[ "state_dict" ] ) else: model.load_state_dict(ckpt ) print ( "--> Local model loaded successfully." , flush=True ) else: print (f "--> Local files not found at '{local_model_dir}'. Falling back to Hugging Face cache..." , flush=True ) model, model_config = get_pretrained_model ( model_name_full ) print ( "--> Remote model loaded successfully." , flush=True ) ### Extract audio sampling rate and video frame parameters from model config sample_rate = model_config[ " sample_rate " ] sample_size = model_config[ " sample_size " ] target_fps = model_config[ " video_fps " ] seconds_start = 0 seconds_total = 10 ### Transfer model parameters to GPU device memory model = model.to ( device ) With the neural weights loaded and validated on the target device, the script is fully initialized to process visual frames and audio prompts.
Processing Video Frames and Conditioning Visual Features Before generating audio, input media files must be normalized and formatted into PyTorch tensors. The read_video helper extracts video frames at a precise target frame rate (target_fps) and duration, aligning visual movement with the model’s time step grid.
If guide audio is omitted, a zero-tensor placeholder is constructed to maintain fixed tensor shape requirements across the conditioning pipeline. For MAF-enabled variants, SynchFormer processes the extracted frames to generate temporal synchronization embeddings.
Combining visual tensors, text prompts, guide audio, and duration metadata into a conditioning dictionary provides the diffusion model with complete multimodal context. This structure enables precise cross-modal alignment between visual actions and generated sound.
What role does SynchFormer play in conditioning video features? SynchFormer extracts visual motion vectors from video frames, transforming physical movement into temporal embeddings that synchronize generated audio events with visual actions.
### Read video frames from file at specified FPS and time interval print (f "--> Reading video frames from: {video_path}" , flush=True ) video_tensor = read_video ( video_path, seek_time = seconds_start, duration = seconds_total, target_fps = target_fps ) ### Load optional reference audio or construct zero-tensor matrix placeholder if audio_path: print (f "--> Loading guide audio from: {audio_path}" , flush=True ) audio_tensor = load_and_process_audio ( audio_path, sample_rate, seconds_start, seconds_total ) else: print ( "--> No input audio provided. Initializing zero tensor placeholder." , flush=True ) audio_tensor = torch.zeros (( 2 , int(sample_rate * seconds_total )) ) ### Encode visual motion feature tokens using SynchFormer network video_sync_frames = None if "MAF" in SELECTED_MODEL: print (f "--> Encoding temporal features with SynchFormer ({model_name_full})..." , flush=True ) video_sync_frames = encode_video_with_synchformer ( video_path, model_name_full, seconds_start, seconds_total, device ) ### Package multimodal conditioning tensors and textual instructions conditioning = [{ "video_prompt" : { "video_tensors" : video_tensor.unsqueeze ( 0 ) , "video_sync_frames" : video_sync_frames }, "text_prompt" : text_prompt, "audio_prompt" : audio_tensor.unsqueeze ( 0 ) , "seconds_start" : seconds_start, "seconds_total" : seconds_total }] By encoding visual cues and constructing the conditioning structure, the pipeline is fully prepared to execute conditional diffusion sampling.
Executing Diffusion Sampling and Exporting Merged MP4 Video The core generation stage uses the generate_diffusion_cond function to denoise latent representations over 250 sampling steps. Using the dpmpp-3m-sde sampler alongside classifier-free guidance (cfg_scale=7), the model synthesizes clear audio aligned with video cues.
Post-processing transforms raw latent outputs into playable audio waveforms. Rearranging tensor dimensions using einops.rearrange, normalizing peak amplitudes, and casting to 16-bit PCM format prepares the output for clean WAV export via torchaudio.
The final step merges the generated audio soundtrack back into the original video file. Calling merge_video_audio combines the processed WAV file with the input video container, outputting a fully synchronized MP4 video ready for playback.
How does the script convert raw latent tensors into playable 16-bit PCM WAV files? The script normalizes the generated output tensor, scales its peak values to fit within 16-bit integer bounds, and uses torchaudio to save the formatted waveform directly as a standard WAV file.
### Run conditional diffusion sampling process over 250 steps print (f "--> Starting audio generation ({steps} steps)..." , flush=True ) output = generate_diffusion_cond ( model, steps = steps, cfg_scale = 7 , conditioning = conditioning, sample_size = sample_size, sigma_min = 0.3 , sigma_max = 500 , sampler_type = " dpmpp-3m-sde " , device = device, ) ### Rearrange audio tensor dimensions using einops print ( "--> Processing generated audio tensor..." , flush=True ) output = rearrange ( output, " b d n -> d (b n) " ) ### Normalize audio float tensor and scale to 16-bit PCM integer range output = ( output.to(torch.float32 ) .div(torch.max(torch.abs(output ))) .clamp(-1, 1 ) .mul(32767 ) .to(torch.int16 ) .cpu () ) ### Save processed audio tensor to disk as WAV file torchaudio.save(output_wav_path, output, sample_rate ) print (f "--> Audio exported successfully to: {output_wav_path}" , flush=True ) ### Merge generated WAV soundtrack back into original MP4 video container if video_path is not None and os.path.exists ( video_path ) : print ( "--> Merging generated audio with original video..." , flush=True ) merge_video_audio(video_path, output_wav_path, output_mp4_path, seconds_start, seconds_total ) print (f "--> Final video saved to: {output_mp4_path}" , flush=True ) print ( "--> Process completed successfully!" , flush=True ) By completing the diffusion loop and executing the remuxing stage, the script outputs a production-ready MP4 file containing synthesized audio that matches the visual actions.
AI Video Sound Effect Generator – Result : FAQ – Video to Audio AI Frequently Asked Questions What is AudioX and how does video to audio AI work? AudioX is an open-source generative model that analyzes visual video frames to produce synchronized audio, sound effects, or background music. It uses neural encoders like SynchFormer to extract visual motion and diffusion transformers to synthesize matching sound waveforms.
Do I need a GPU to run this AudioX Python script? While the script can fall back to CPU execution, an NVIDIA CUDA-capable GPU is strongly recommended due to the intensive diffusion sampling steps required for audio generation.
What is the difference between AudioX-MAF and AudioX-MAF-MMDiT? AudioX-MAF incorporates Multimodal Adaptive Fusion for combining text, video, and audio prompts. AudioX-MAF-MMDiT adds a Multi-Model Diffusion Transformer architecture for higher audio fidelity and improved temporal alignment.
Why do I need to install FFmpeg and libsndfile separately via Conda? FFmpeg handles low-level video frame extraction and final MP4 audio merging, while libsndfile processes raw audio buffer encoding. Both system libraries are required by PyTorch and torchaudio for media processing.
How long does it take to generate audio for a 10-second video? On a modern GPU like an NVIDIA RTX 3060 Ti, generating 10 seconds of audio using 250 diffusion steps typically takes between 15 to 30 seconds.
Can I guide the audio generation using text prompts in addition to video? Yes, the conditioning pipeline accepts a text_prompt parameter alongside video frame tensors, allowing you to specify instruments, sound effects, or acoustic styles.
How does SynchFormer ensure audio is synchronized with visual actions? SynchFormer analyzes spatial motion vectors across consecutive video frames, generating temporal embeddings that pinpoint exact timestamps for visual actions like footsteps or impacts.
Why does the code convert generated audio tensors to 16-bit PCM format? Converting floating-point diffusion tensors to 16-bit signed integers normalizes audio amplitude levels, preventing clipping distortion before saving standard WAV files.
Can I run this AudioX workflow on Windows without WSL? While possible, running under Windows Subsystem for Linux (WSL) avoids pathing issues, simplifies FFmpeg C-library dependencies, and ensures stable CUDA GPU acceleration.
Is the generated audio free for commercial use? Pretrained AudioX models are watermarked and released under CC-BY-NC licenses, making them strictly intended for educational, research, and non-commercial development workflows.
Conclusion: Master Local Multimodal Generative Audio Inference Mastering video to audio AI opens up entirely new possibilities for technical content creators, AI developers, and video editors who want to automate sound design. By executing the AudioX architecture locally through Python and WSL, you gain full control over every step of the multimodal generation process—from raw video frame ingestion to synchronized 16-bit audio output.
Throughout this guide, we explored how the Multimodal Adaptive Fusion (MAF) module and SynchFormer feature extractor evaluate visual movement and align acoustic waveforms with exact video timestamps. We established an isolated Anaconda environment, implemented dynamic local model loading, and built a production-grade inference script capable of producing high-fidelity sound effects or musical scoring without relying on costly subscription-based SaaS tools.
As deep learning models continue to bridge visual and auditory domains, open-source frameworks like AudioX demonstrate the tremendous potential of localized AI processing. By integrating these custom PyTorch scripts into your automated media workflows, you can turn any silent footage into an engaging, multi-sensory experience at zero cost.
Connect : ☕ Buy me a coffee — https://ko-fi.com/eranfeit
🖥️ Email : feitgemel@gmail.com
🌐 https://eranfeit.net
🤝 Fiverr : https://www.fiverr.com/s/mB3Pbb
Enjoy,
Eran
 Skip to content